Tuesday, May 31, 2011

Crispy Tofu & Edamame

Yesterday we went on a meat-binge.  We had a lovely lunch at Fogo de Chao in honor of my Hub’s birthday.  It was fabulous, but we ate more meat in one sitting than we typically do in an entire week, especially red meat.  It’s an indulgence we only do once or twice a year…and I always end up feeling sluggish & guilty for a couple days afterwards.  

To help remedy that, it was a meatless dinner night tonight in our household.  More specifically, it was a “meatless appetizers for dinner” kind of night…I made crispy tofu with a trio of dipping sauces & served it with boiled edamame seasoned with sea salt.  And yes…you don’t have to say it…I realize that fried tofu does not equal a healthy meal.  But it’s not a steak, ribs, chicken, or anything else that once made a barnyard sound.  Plus, I had tofu in my meat drawer that I needed to use.  

Crispy tofu & peanut ginger dipping sauce.

Edamame are immature soybeans, which are a great source of vitamins, minerals, fiber & protein.  I love that our local big chain grocery store (Kroger) now carries edamame.  I normally have to look for it in the organic food freezer case.  I love having the option to get it on my regular grocery run without driving to my favorite international grocery store. 


Currently my Kroger carries Seapoint Farms Edamame


Just follow the directions on the package for cooking it—some varieties are parboiled & others require a longer boiling time until the pods are tender.  Drain & sprinkle the pods with salt.  To eat edamame, either take your fingers to open the pods to remove the beans, or use your teeth to pop the beans out of the pods.  You do not want to eat the outer pod—it is stringy, fuzzy & fiber’y.  Not good.     

You will want a spare bowl on hand for the empty shells to go into


Crispy Tofu
Serves 2-4, Prep time 5 min, Cook time 10 min

Ingredient Lineup. Simple & Quick
Ingredients
  • 1 package of firm or extra firm tofu
  • Corn starch
  • Vegetable Oil
  • Salt (optional)

Directions
1.  Remove tofu blocks from water.  Only remove the amount of tofu you will use (for 2 people as the only dinner entrée, I normally use a full package. For an appetizer for 2, I use 1/2 package).  Cut tofu into 1-inch cubes.  Dry tofu thoroughly with paper towels, gently blotting the excess water out of the tofu.

Whole slices from the package, excess water removed

Slices cubed. It doesn't hurt to dry off individual cubes.


2.  Place the tofu in the bottom of a quart/gallon storage bag, or on the bottom of a quart/gallon storage container.  Generously sprinkle top of tofu with cornstarch, & lightly sprinkle with salt.  Seal & toss tofu gently until evenly coated in a thin layer of cornstarch.  

Pre-coating with cornstarch

Post-coating with cornstarch.  You want a THIN
layer of cornstarch on the outside of the tofu.
Too thick, & the taste will be hard & metallic.

3.  Heat approximately 1-inch of oil in skillet until it reaches frying temperature (but do not let oil smoke/scorch).  Carefully add tofu to oil & fry until golden brown, 8-10 minutes. WARNING—beware of “exploding tofu.”  It can happen.  Sometimes there are small air/water pockets within the tofu that can expand & pressurize when frying. Normally the tofu will just splatter out into the oil a little bit & not jump out of the pan.  You can get a little bit of grease splatter with this though (similar to the grease pops  when frying bacon), so I would keep kids & pets away from the stove while cooking, and wear an apron to protect your clothing.

Tofu sizzling.


4.  Remove tofu from oil when it reaches a light golden brown color, or when the cornstarch breading feels firm.  Serve with dipping sauces.
Finished tofu.  I let the cornstarch get a little too thick on
a few of the pieces.

Trio of dipping sauces.  Front= Sweet & Hot Sauce,
Middle= Citrus Ponzu with Hot Sesame Oil,
Back= Peanut Ginger Sauce

Dipping Sauce #1- Peanut Ginger Sauce
Same recipe as the dressing for Colorful Asian Slaw

Peanut Ginger Dipping Sauce Ingredient Lineup

Ingredients
  • 1 T. rice wine vinegar
  • 1 T. vegetable oil
  • 2.25 t. creamy peanut butter
  • 1.5 t. soy sauce
  • 1.5 t. brown sugar
  • 1 t. fresh ginger, minced finely
  • 0.75 t. fresh garlic, minced finely

Directions

1. Warm peanut butter for 15-30 seconds in the microwave. Stir in other ingredients until well mixed. Serve.

Dipping Sauce #2- Citrus Ponzu with hot sesame oil
Ingredient lineup.  Super simple. 

Ingredients
  • Ponzu
  • Hot Sesame Oil, to taste

Directions:
1. Stir ingredients together, serve.


Dipping Sauce #3- Sweet & Hot Sauce  (Siracha Honey)
Ingredient Lineup.  Again, simple.
Ingredients
  • 4 T. Honey
  • ¼ t. Siracha + more to taste
  • 1 t. water [optional]

Directions
1.  Warm honey in the microwave until thin & runny (approximately 10-20 seconds depending on microwave).  Add siracha, stir gently until well mixed.   If you want a thinner sauce, stir in 1 t. of warm water.  

Inch by Inch


Here's the progress on my first knitted scarf so far.  My fears are confirmed...it's going to be a monster.  A 12" wide monster.  I think I'm about halfway done at about this point.  I'm doubting i will ever make a scarf that is this wide again...the progress is too slow.  My speed with knitting has increased significantly though.  So that's a plus...inch by inch.


PS-  I still have hopes on posting a resource guide on sources I have found helpful during the process.  I also still hope to sign up for a class at a local yarn shop if it ends up working out with my schedule.  

Wednesday, May 25, 2011

Spicy Cilantro-Lime Marinated Flat Iron Steak

This is a fun recipe that we have cooked a few times. I use a slightly modified version of the original recipe that can be found at allrecipes.com.  It is easy to make, takes very little hands-on preparation time, and makes wonderful steak tacos.  Normally I would use a red onion like the recipe suggests, but this time I used a yellow onion since that was what I had in the pantry.  I didn't notice that there was much of a difference in the cooked steak flavor with the yellow onion...but I didn't like the green sauce as much this time as when I have made it before.  For the lime juice you can either use fresh lime juice or bottled lime juice, with this recipe there is not much of a flavor difference. You can also use a different cut of meat, like flank or skirt steak if you want. I prefer flat iron steak just because you can get good deals on it & it picks up flavors well.  

I served this tonight with flour tortillas, queso fresco, fresh lettuce from our garden, various hot sauces & the extra green sauce from the recipe.  I hope you enjoy!  

Not that pretty...but it was delicious.
Spicy Lime-Cilantro Marinated Flat Iron Steak
Serves 2-4, Prep time= 5 min, Marinating time= 12-24 hours, Cook time= 10-20 minutes

Ingredients
Ingredient Lineup
  • 6 cloves garlic
  • 1/2 of red onion
  • 2 limes, juiced
  • 1-2 medium jalapeño peppers
  • 1 T dried thyme
  • 1 bunch fresh cilantro (approximately 1 cup cilantro leaves)
  • 1/4 c vegetable oil
  • 2 T honey
  • 2-3 pounds beef flat iron steak
  • kosher salt to taste
Directions

1.  Cut stems off of cilantro.  Combine all ingredients in a food processor or blender.  Blend until ingredients are liquefied.

The sauce is really green...
2.  Put steak into a large gallon resealable bag.  Add 3/4 of the sauce to the bag & massage into the steak.  Place bag on a plate & place in the refrigerator.  Marinate for 12-24 hours. Move the remaining sauce into a sealed container & save for a condiment for the tacos.  

Let it chill overnight.  Notice the extra sauce
in the background.  Save it as a taco
topping for the meal.
3.  Remove steak from fridge & let it warm up on the counter for 15-20 minutes.  Remove steak from the marinade & shake off extra marinade.  Discard marinade & bag.  Preheat grill to Medium-High.

Steak post marinade.
4.  Cook steak on grill to desired doneness. We cooked this about 5-7 minutes per side, which yielded a good Medium-Rare/Medium on our grill.  Your cooking time will be dependent on your grill (this can also be cooked on a grill pan).  Let the steak rest 5-10 minutes prior to cutting.  Cut the steak across the grain into thin strips.

Sizzle Sizzle.
Zzzzzzz...it's resting...

Slice thinly.
5.  Serve steak with tortillas & your choice of toppings.

Our toppings for tonight: hot sauces, fresh garden lettuce,
green sauce & queso fresco.  

Enjoy!!


Tuesday, May 24, 2011

Super Easy, Super Fast, Super Cheap Chocolate Cake Mix Cookies

This is a "go to" recipe for me.  I was given then recipe by some anonymous woman who stopped by our garage sale a few years back.  I wish I had gotten her name so I could give her credit for this one...They are super easy, super quick, super cheap, & make a lot of cookies...

I make several varieties of this cookie, & I'm sure over time I will end up posting all of the varieties in different posts (once I make the batches to take photos). This post will focus on the chocolate cookie variety.  They only require 3 ingredients, & one of the main ingredients is cake mix.  Any standard-sized boxed chocolate cake mix will work.  I tend to stock up on Duncan Hines or Betty Crocker cake mixes when they go on sale for $1 (because then they are nearly free with coupons...).  You can then mix-in about anything you want to use. Tonight I made my favorite variety, chocolate-chocolate chip with Ghirardelli bittersweet chocolate chips.  These cookies are also really good with chopped nuts, raspberry chocolate chips, or any other mix-in you have on hand.

The best thing about this particular cookie variety, is that they make THE BEST homemade ice cream sandwiches.  For our dessert tonight we made ice cream sandwiches using Graeter's Coconut Chip Ice Cream. Yumm...
Best. Ice cream. Sandwich. Ever.


Easy chocolate-chocolate chip cake mix cookies
Yields 24-36 cookies, Prep/Cooking time 10-12 minutes

Ingredients
  • 1 box of chocolate cake mix (tonight I used Betty Crocker Chocolate Fudge, usually I use Duncan Hines Devil's Food cake mix)
  • 2 eggs
  • 1/2 cup of vegetable oil
  • 1/2 cup chocolate chips [optional]
  • any other mix-ins you want to use [optional]
Directions

1.  Preheat oven to 350 degrees.

2.  Right before you bake the cookies, sttir all ingredients in large mixing bowl until well-blended. It helps to mix eggs & oil together first.  You do not want to mix the batter too far in advance, the cookies will be really flat when they cook.  

Beat eggs & oil

All ingredients mixed...

3.  Spoon onto 2 "un-greased" cookie sheets. I prefer to use a melon baller so the cookies are fairly uniform in size, but you can use the original "spoon drop" method too.

Cookies spooned out & ready to bake.

4.  Cook for 8-10 minutes.  Cookies will start to get a dull/cracked appearance on top when they are almost done.  You want these to stay soft & chewy. Cookies may flatten out when you take them out of the oven, that's perfectly fine.  

An example cookie.  Normally my cookies are round :-/...
This time, in my hurried state, they were all lopsided. 


5.  Let cookies cool on the pan for 5-10 minutes prior to moving to cooling racks, otherwise they may fall through the racks. These are REALLY soft when you first take them out of the oven.

Enjoy!

Monday, May 23, 2011

Design your own iPhone case! (or Blackberry case)

Disclosure: This is an uncompensated, unprovoked review of a product I absolutely love.  If anyone wants to provide me with stuff to review for compensation or free gear, I am not too proud to accept that challenge…:-)

I’m a klutz. Not just your average “I drop things” kind of klutz--but the kind of klutz who manages to trip & fall on bleachers and break an ankle (true story from the 6th grade—my parents & I told people it was a sports injury…it happened in a gym).  A “I don’t wear heels taller than 1.5 inches, not because of my 5’9” height, but because of the danger to myself & others” kind of a klutz. The kind of klutz who should probably be required to wear steel-toed shoes in the kitchen because she is known to drop knives.  The kind of klutz that my husband & parents were afraid for me to move into a house that had 3 different sets of stairs....Get the picture?

Last fall when I expressed an interest to get an iPhone4, my husband laughed and said “Are you sure YOU want to get a phone that is totally encased in glass?”…  I grasped the meaning of his hint.  I was going to drop my phone and break it.  But I ignored the warnings & got an iPhone4.  I liked the improved features over the 3GS option.  The better quality camera & flash were really important to me.  Actually, all of the photos on this blog so far have been taken with my iPhone…

I knew that due to my klutzy nature, I was going to need a GOOD case.  A strong case.  A case that could take a beating.  I investigated the different options.  99% of the people I asked recommended Otterbox cases.  So I looked at them, & held people’s phones that had Otterbox cases. Don’t get me wrong, I love actual Otters as much as anyone, but there is nothing cute & adorable about Otterbox cases, other than their logo on the packaging.  They take a beautiful, sleek, modern device, and encase it in a hideous, malformed Nerf football.  Lovely.  Women’s pants pockets are small enough as it is, I can’t imagine having to dig a Nerf blob out of my pocket every time I wanted to look at my phone to read a text message or check the clock.

After some additional research, and googling my fingers off, I found the perfect option.  It’s fabulous.  At case-mate.com, you can design your own “tough case” for the iPhone 4, iPhone 3G/3Gs,  the Blackberry bold, or the blackberry curve phones. You have a few different options: (1) you can mix & match colors of cases, (2) upload your own image or graphic, or (3) use preexisting design elements from a group of artists to build your own unique design.  Designing your own case(s) is an incredibly fun way to waste several hours online…

So around the time I got my phone, I designed my own case.  The case I ordered utilized design elements by artist ­­­­Anthony Yankovic & it is incredibly cute in my opinion.  

My phone cover...

 I like the case-mate tough cases because:
  • They have 2 layers of material.  The bottom layer is a rubbery, bouncy silicone and the outer layer is a hard, glossy plastic.
  • The design is not painted/screen printed onto the case, but is actually printed into the plastic.  Therefore the decoration holds up to scratches & dents. 
  • The case slides easily in & out of pockets due to the glossy plastic.
  • They come with a screen protector.
  • They allow you access to all of your buttons & plug-ins…so you can place the encased phone on iHome radios and other charging dock devices without taking it out of the case.
  • Being able to design your own case is Incredibly fun.

The only downside is that it takes a little longer for processing/shipping of the case, since the plastic has to be printed. Also, the glossy finish can cause a slippery grip.  Luckily the silicone bottom layer overhangs in places & adds some grippy’ness.  Plus, they are a little pricey at around $40.00...but that is what you pay for a lot of the "tough" cases...

Fast forward 6 months…[insert ScoobyDoo time-warp music here]

My husband & I had been out hiking for 5-6 hours one beautiful Saturday morning.  We were on our way home & decided to stop for a quick lunch at a Burger King because we were famished and still had a 2 hour drive home.  After we were done eating, I stand up from the table with my phone in hand & start walking towards the door…and in some kind of spastic moment, that is yet to be defined how it happened, I ended up doing a full-on, full-strength, football-spike-in-the-end-zone type maneuver with my phone…onto a hard tile floor.  I gasped.  For a split second my brain thought “[expletive!] I should have gone with the Nerf football case!”  I was speechless, & perhaps shell shocked.  My husband may have even picked up my phone for me due to my inability to move…

After a close inspection of my phone, it was perfectly fine. No shattered glass, no broken speakers, the touch screen worked perfectly, etc. Amazing. The case was not as lucky.  On 2 of its corners, it had little hairline cracks, but was still totally functional.  With the force the phone hit the tile floor that is REALLY impressive.

After some discussion on the car ride home, my Hubs and I decided that the phone case should be treated like a bike helmet.  After a bad crash—it should get replaced.  When I got home that evening I re-designed my original case (since I loved it) & reordered it.

In the 6 months since I ordered my original DIY tough case, case-mate made some design & manufacturing improvements.
  • The volume & vibrate toggle switches are easier to use.
  • The hard plastic case has a bigger indention at the bottom, allowing it to sit more easily in a charging dock.
  • The colors on the design are darker & more vibrant.

Overall, I am EXTREMELY happy with the case-mate tough case.  I recommend it to everyone I know who is looking at getting an iPhone.  It is truly a phone saver. Not to say that it will protect your phone in 100% of all circumstances (nothing will)…but overall I trust that the case is going to mostly protect my phone from my very klutzy self.   

Tips: 
  • Sit on your design for awhile before ordering, make sure you love it.
  • Make sure your design overlaps the outside of the design rectangle, because your design will actually wrap along the outside of the phone (important w/ iPhone 4’s due to their box-like shape)
  • Check retailmenot.com for coupons for case-mate.com, which could get you a product discount or free shipping.

Sunday, May 22, 2011

Citrus Glazed Pork Belly

On the Saraga trip this week, my Hubs also picked up a package of pork belly. Pork belly is the same magical cut of pork that bacon is derived from. The difference is that pork belly hasn't been smoked/cured like bacon & is still in its natural state.  While we are hoping to experiment with curing/smoking our own bacon this summer, for this round of pork belly I wanted to braise it. Braising is also an excellent cooking method when you have a tougher cut of meat to cook AND you have an excess of vegetables like carrots, onions, & celery that you need to cook.  With the vegetables in this recipe, I would not recommend eating them at the completion of the cooking.  I tasted a few of the veggies--they were overdone & the flavor wasn't that great.  They add great flavor to the cooking meat though & help raise the meat up out of the cooking fluid.

This recipe is altered from a recipe found at food.com by user Sackville.  It is altered to serve 2-3 & to cook with things I had on hand. I served it with garlic-soy green beans. Overall, the flavor on this was excellent.


Citrus Glazed Pork Belly
Serves 2-3.  Total cooking time: 3 hours, 30 minutes.


Ingredients
Ingredient Lineup (minus the brown sugar)
Pork belly closeup

  • 1-2 pounds boneless pork belly, cut into individual portions
  • Kosher salt
  • Ground black pepper
  • 1 large onion, coarsely chopped
  • 2 ribs celery, coarsely chopped
  • 1.5 cups baby carrots
  • 2 cups chicken stock
  • 1/4 cup frozen orange juice concentrate, undiluted
  • 2 T. brown sugar
  • 3 whole cloves
  • 1.5 t. dried thyme
  • 0.5 t. ground allspice
For glaze
  • 1/4 cup frozen orange juice concentrate
  • 1/4 cup sugar
Directions

1.  In a medium mixing bowl or liquid measuring cup, whisk together the chicken stock, orange juice, brown sugar, cloves, thyme & allspice.  Set aside.
Stock, OJ & spices.


2.  Remove pork belly from packaging.  Check to verify it is boneless, and remove bones if necessary.  If the pork belly still has a layer of skin, use a sharp knife to carefully separate the skin from the meat, reserving as much of the fat layer as possible.  Score the fat layer on the top of the pork belly with the knife, making shallow diagonal cuts across the thickest parts of the fat.  Generously rub salt & pepper over all surfaces of the pork pieces.
Make sure your knife is sharp...
Carefully separate the skin from the meat.

Score meat & rub with salt & pepper

3.  Coarsely chop all of your vegetables.  Layer your veggies into the bottom of a medium sized roasting pan. (For smaller roasting/braising jobs like this, I use a 9x13" baking pan that was the unfortunate, charred victim of a bacon-incident when serving brunch for 45 people about a year ago...it's not pretty, but it works).  

Notice my onion changed colors.  I had a bag of mixed red
and white onions in my produce drawer that were pre-chopped
and needed to be used...

4.  Place the portions of pork belly on top of the chopped vegetables, fat side up.  Place the pan under a high broil for 5-10 minutes until golden brown.  Remove pan from oven.  Turn oven down to 300 degrees.  
Pre-Broil

Post-Broil

5.  Pour the chicken stock/orange juice mixture around the pork belly inside of the pan.  Tightly cover pan with aluminum foil.  Roast for 1.5 hours at 300 degrees.
Pre-Braising
Indent the foil on top of the pan so that juices condensate
back into the pan.  
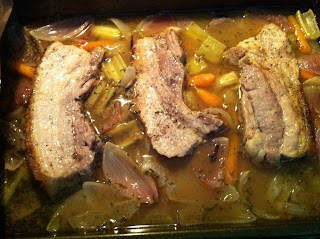
After 1.5 hours of cooking

6.  Remove pan from oven, fold back foil and roast for an additional 1.5 hours.
Foil pulled back

After a total of 3 hours of braising.
7.  When the pork belly has about 30 minutes left to cook, start reducing the glaze.  Add the orange juice concentrate & the sugar to a small saucepan.  Cook on medium heat until glaze is thickened & syrupy. Stir frequently. 

Glaze at the beginning

Thickened glaze

8.  Remove pan from oven.  Move the pork to a cookie sheet that has been lined with aluminum foil & greased slightly with olive oil.  Brush all surfaces of the pork belly with a thick layer of the glaze.  Broil under high for 5-10 minutes until surfaces are crisping & the glaze is caramelizing. 

Pork Belly, glazed & broiled


9.  Plate pork belly & drizzle with a little bit of the remaining glaze.  

Very, Very Yummy...