Monday, January 23, 2012

Boozy Bourbon Ice Cream

One of my fabulous Christmas presents that my husband got me this year was the ice cream maker attachment for my Kitchenaid Stand Mixer.  This is probably the most awesome thing ever…but was probably the most dangerous thing we could have brought into our household. In the first 5 days of 2012, we made 4 batches of frosty treats. Yea... 

Yay ice cream maker!
We have now kicked this habit back to 1 batch of deliciousness a week.  The recipe for this week was a special request from my husband.  The past few months we have seen several boutique ice creams that use either bourbon or whisky as a flavor element.  His special request was for “bourbon ice cream.”  I modified a recipe that I found online…

A note on adding alcohol to ice cream.  Ice cream “batter” tastes super sweet, but the sweetness calms down when it is frozen. I thought maybe the same thing was true about alcohol…but it’s not.  If you add more booze, it’s going to taste boozier.  So stick to the ratio of alcohol listed below, don’t let your husband talk you into adding 2-3 more tablespoons of Makers Mark. [true story] I want to try this recipe again using Amaretto…yum. We served this when it was "half-set" with warm, soft snickerdoodle cookies.

Enjoy!

Bourbon Ice Cream (modified from David Lebovitz on Finecooking.com)

Ingredients
  • 2 cups heavy cream 
  • 1 cup whole milk 
  • 3/4 cup granulated sugar
  • 5 large egg yolks* [see note below]
  • 3-4 tablespoons bourbon 
  • 3 teaspoons vanilla extract

Ingredient Lineup

Directions
1.  Prepare an ice bath by filling a large bowl with several inches of ice water. Set a smaller metal bowl (1.5 quarts or larger) in the ice water. Pour in 1 cup of cream in the inner bowl. Set a mesh strainer on top.

Cream in the ice bath
2. Whisk the egg yolks in a medium bowl.

3. In a medium saucepan, warm 1 cup of cream, the milk, & sugar over medium-high heat until tiny bubbles begin to form around the edge of the pan (1-2 min).  In a steady stream, pour half of the warm cream mixture into the egg yolks, whisking constantly to prevent the eggs from curdling. Pour the egg mixture back into the saucepan and cook over low heat, stirring constantly and scraping the bottom with a heatproof rubber spatula until the custard thickens. Don’t let the sauce overheat or boil, or it will curdle.

Slowly streaming the hot cream mixture into the beaten eggs.
Stir constantly, or you will end up with runny scrambled eggs.

Custard that is not ready yet...

Custard that is ready to cool down. Do you
see the difference?
4. Immediately strain the custard into the cold cream in the ice bath.

Strain the custard to remove any curds or lumps.
5. Cool the custard to below 70 degrees Fahrenheit by stirring it over the ice bath. Stir in the bourbon and the vanilla into the cooled custard.

Swirling in vanilla and [too much] bourbon
6. Refrigerate the custard until completely chilled, at least 4 hours. Then freeze the custard in your ice cream maker according to the manufacturer’s instructions. Transfer the just-churned ice cream to an air-tight container and freeze for at least 4 hours or up to 2 weeks.


Ice cream whirling away

Semi-set ice cream...pop it in the freezer for a few hours

Warm snickerdoodles with semi-set ice cream

My husband's bowl of bourbon ice cream...

He decided to round it off with some caramel sauce.  I've been
challenged to make bourbon caramel next...
*A note on what to do with the egg whites generated from this recipe: make meringue cookies, make a meringue pie, add one whole egg & make an omelet for two (to make it super fluffy, use a mixer to infuse air into the eggs), egg whites will also freeze for future use-just mark the bag with the date you are freezing them and how many egg whites are in the bag.


My recommendation for seperating egg yolks is this method.


Line up 3 bowls-- 1 to store egg whites, 1 to crack eggs into, & 1 to put the egg yolks in. The bowl for the middle is to catch each individual egg white. That way, if you accidentally break a yolk, you are not ruining you bowl of egg whites or egg yolks.  Crack an egg on the counter & strain it through your fingers, keeping the yolk from slipping into the bowl. Gently roll the egg yolk around your fingers until it gets slightly sticky, indicating that the majority of the egg whites are removed.


Whites on the left, newly cracked white in the middle, clean yolks on
the right. Then I put the shells in a grocery sack for disposal
or adding to compost bin.

Gross, but is the way to get the "cleanest"
egg yolks in my opinion.

Snicker-doodle-do!

[Please forgive the formatting issues on this post] My favorite cookie will eternally be the soft, semi-baked blissfulness of a chocolate chip cookie straight from the oven.  That cookie’s too soft to remove from the cookie sheet, you say?  That’s ok, I’ll stand here in my kitchen & eat one with a spoon straight off of the cookie sheet until they set up a bit [true story].

However, the cookie that ties for #2 in my heart is a perfectly made snickerdoodle.* I think my affinity for the snickerdoodle comes from the fact that I rarely had it as a kid, mainly as a result of my love of chocolate-chippers per previously discussed. Snickerdoodles were something I only had at school, since you didn’t get a choice of cookie flavor, or on the rare lunch outing at Shapiro’s where my parents would let me pick out a cookie from the bakery after our meal.

But in my previous attempts at baking snickerdoodles, I have been unhappy with the results. They were too crunchy, too blah, or just didn’t live up to my standards of snickerdoodle’dom.  Last week in a recipe e-newsletter that I receive, it listed a user-submitted recipe for “Soft Snickerdoodles.”  I was intrigued. Maybe it was for my craving for sugar at that time, or maybe it was the back of my brain still feeling dejected from my prior snickerdoodle failures…but I pinned the recipe in my “recipes to try” board & sat on it for a few days.**

Enter the weekend—I had some time to kill while a batch of bourbon ice cream I was making for my husband was spinning…so I randomly decided that warm snickerdoodles could be a good dipping vessel for bourbon ice cream. Plus, I had all of the ingredients.

I made the recipe per instructed, minus the step about chilling the cookie sheet.  I didn’t do that step for a couple of reasons 1) I don’t have room in my fridge to randomly set a cookie sheet in it. I cook—I have ingredients & leftovers, it’s full.  2) It’s January & my kitchen island is made of stainless steel.  I could store meat on that thing & it would stay at a safe temperature.   The other small variation I had is that my cooking time ended up being about 2-3 minutes longer than the recipe instructs. My first attempt to “immediately remove from the baking sheet” per the instructions, resulted in a cookie falling straight through the cooling rack with a loud ‘plop.’*** But that could also be due to our cruddy, uneven heating oven.  If you were using a convection oven, or one that could consistently maintain a temperature, this might be a non-issue for you. 

Overall, I was pretty happy with the recipe. A few suggestions:
  • Next time, I would make a half batch.  This recipe says it only makes 24 cookies, but my total estimated number would have been closer to 3-4 dozen w/ 1 inch balls of dough (had I made them all…I ended up reserving part of the dough to cook later, & then forgot to cook it the next day :-/).
  •  I would also vary the spice level a bit. I used my “sweeter” cinnamon, instead of my “hotter” cinnamon, and I think in future attempts I would either use a combination of the two or solely the “hotter” cinnamon. I am also tempted to toss in a little dash of ground ginger & allspice in the next attempt.
  • Next time I would use my stand mixer to make this dough. My stand mixer was occupied with spinning down the ice cream, so I attempted to mix with a spoonula. The dough is pretty stiff, & I finally had to use my hands to incorporate it all.  I don’t like getting my hands messy if I can help it…


Soft Snickerdoodles (submitted by Food.com user JuJu Bee)

Servings: “24” [see note above]
Prep time: 10 min. Wait time: 10 min. Cook time: 10-14 min [see note above]

Ingredients
  • 1 cup butter, softened (2 sticks)
  • 2 eggs
  • 1 ½  cups sugar
  • 2 ¾ cups flour
  • 2 t. cream of tartar
  • 1 t. baking soda
  • ¼ t. salt
  • 3 T sugar
  • 3 t. cinnamon

Ingredient Lineup

Directions
1. Preheat oven to 350

2. In a large bowl mix the butter, eggs & sugar together. In a medium bowl, mix the flour, cream of tartar, baking soda & salt together. 

Flour mix on the left, butter mix on the right.

3. Gradually mix the flour mixture into the butter mixture (I do it in thirds)

I had to get my hands dirty :-/...next time I'm using the stand mixer
4. Chill dough & chill an ungreased cookie sheet in the fridge for 10-15 minutes.

5. In a small bowl, mix 3 T of sugar & cinnamon.

6. Scoop small balls of dough & roll them in the cinnamon mixture to evenly coat the whole ball (I use a melon-ball scoop for uniformity).

A melon ball scoop = uniform cookies
Next time, I'm making a half batch. Too much dough!
7. Place on chilled baking sheet & cook for 10 minutes (10-14 minutes)

8. Move from pan to cooling rack immediately.

Soft & Delicious
We had them with some half-set Bourbon Ice Cream

*My other tie for #2 favorite cookie will be made & discussed for a future blog entry…2 batches of cookies at 1 time in our house = bad idea.

**Hello Pinterest. I now understand why the logical, responsible side of my brain resisted you for so long. You are ‘e-crack’ of an extreme magnitude…and I love you & don’t know how I lived without you for so long.

***Dear Santa & Birthday Elves—I need these cooling racks for my birthday next year. Our wide-wire ones don’t cut it. You can check out my “kitchen stuff I want board”* for additional ideas.

Monday, January 16, 2012

When you're "old"- you spend weekends doing this...

When you're "old & married," you find yourself doing fun things on the weekend like wandering around home improvement stores for 2 hours, discussing & dreaming of future home improvement projects. Such an exciting life... :-)

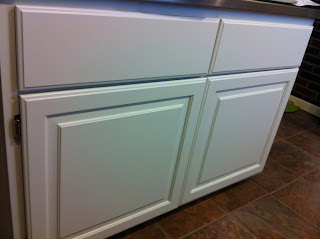
One home improvement project we have been debating since we moved into the house nearly 2 years ago is the subject of "kitchen cabinet hardware." The prior homeowners had updated the cabinets in the kitchen with new painted wood doors & drawer fronts.  They look nice, however there weren't any handles or knobs on them, which is really frustrating when your fingers are grubby from cooking & you need something out of the cabinet.  We initially delayed purchasing & installing hardware because the status of a kitchen island was still in limbo. I didn't want to get hardware for the cabinets, not knowing if we would be buying a prefab island with hardware that would be hard to match.

When my parents bought us an amazing custom island last summer we could have installed hardware on all of our cabinets, but then it became an issue of finding hardware we liked.

When we were at IKEA in December, we finally settled on the hardware.  It's similar to a style we liked in a hardware store, except the hardware was half the price per piece at IKEA. The hilarious thing is that we had forgotten the tally of how many knobs & pulls we needed at home...so we spent a good 20 minutes in IKEA diagramming our kitchen, referencing photos on our phones, etc to verify our count. Fun times.

We purchased the hardware in early December and then it sat in the bag until this past weekend.  It wasn't that we didn't have time to install it before now, it's because with any project like this, I have to sit on it for several weeks before I commit to having holes drilled in our possessions. Sometimes I have a fear of change...

Luckily I have a husband who is very detail oriented when it comes to projects like this. Because of his awesome "measure 3 times, drill once" skills, we now have a more user-friendly & polished looking kitchen.

Now for some pictures & tips...
Overhead Cabinet Example- Before
Overhead Cabinet Example- After
Base Cabinet Example- Before

Base Cabinet Example- After (I'm still not 100% sold on this
style of pull on our funky little drawers [which shouldn't have the
decorative trim]...but whatever, the holes are now there :-) )
Island- Before

Island- After
My rock star hubster
Masking tape on the cabinet doors gives an easy place to
mark where to drill & helps contain the sawdust & helps
keep the wood from splintering.
Buy a cabinet template to help you make sure all of your
knobs & pulls are mounted in the same place.

Since we had to pull everything out of the island drawers,
I took that opportunity to alphabetically organize my spice
drawer.  OCD Love. 

Sunday, January 8, 2012

Household Hint- improve your duvet cover

To me there is nothing better than sleeping under a cozy down comforter during cold winter nights. But it is also frustrating to reach for your comforter in the middle of the night & find out that your comforter is all bunched down in the bottom of the duvet cover. This easy solution also makes it easier to put your cover on your comforter. Also, this is a perfect way to modify an old printed comforter/bedspread to use it in a duvet cover for giving a bedroom a cheap redesign or upgrade.

 All you need is a spool of thread, two or four 6" pieces of ribbon, and a needle.

I used white because our new duvet cover is white. But if
you have a darker cover, the color of the supplies doesn't matter.

First step, turn your duvet cover wrong-side-out & spread it out flat on your bed (or a table) Fold 1 piece of the ribbon in half. Using the needle & thread, sew the folded ribbon into the bottom corner of the duvet. Be careful to only put stitches on the edge of the hem (you don't want the stitches to show when the cover is right-side-out).

Easy as pie. Just make sure to stitch it along the hem.

Repeat the step above with the opposite corner. Then, if the comforter you are using doesn't already have loops or ties on the corners, repeat this step with the bottom corners on the comforter. Our down comforter already had loops. So next, spread the comforter flat on top of the duvet cover.

Then tie the ribbon to the loops on the comforter. Then, all you have to do to wrestle your comforter into the cover, is to reach inside of the cover, grab a corner & pull. Repeat for the other side & shake your comforter into place within the cover.

See the sewn-in loops on the comforter (left side)
Little bow & you are done.

This is so easy, that I can't comprehend why the manufacturers don't do this from the start? But 3 of the last 4 duvet covers I've owned have been missing this feature. The reason I love to make sure the comforter is secured with ties is because it is super easy to straighten the comforter within the cover, leading to a less lumpy bed covering :-). In other news, here are 2 bad photos of our new bedding. It brightened up the room room a lot from the dark brown duvet cover that we had & it also gives us more options for sheets when we can no longer find our color of green sheets (that happen to match the curtains & lampshades...)


Friday, January 6, 2012

Back! For real...my resolutions demand it.

Wow...was it really September the last time I blogged?!? One of my resolutions this year was to start back on blogging, and to average 1 post a week. Not many people read this thing, but I personally enjoyed writing the blogs & taking the photos. Life just started getting a little more chaotic towards the end of last year, and my blog was back-burner'ed (or fell behind the stove & started gathering dust bunnies & grime). I was also losing a technology war. I was taking most of the photos with my iPhone & would have to email them to myself, download them to my laptop, & then write the blogs in my free time. It was a recipe for a pile of photos to accumulate & numerous blogs to go unwritten. Now I have my photos backing up to iCloud (thanks iOS 5.0!), which makes them accessible on my laptop, & my brand new iPad. Throw in a blogging app...and maybe this will be the secret to more consistent blogging? We'll see... For now, here's a quick glimpse into the past 4 months... In October we saw the Grand Canyon...

It's amazing.  I couldn't grasp how HUGE it was until I saw it.

and we saw the fountains of the Bellagio in Vegas (in my next life I want to be a fountain programmer...)...

I wasn't prepared for how loud the water was.
In Vegas we enjoyed some amazingly delicious treats from Jean Philipe Patisserie...

Raspberry Rose Tort

November rolled by...I hosted Thanksgiving, and smothered our turkey in bacon...

Definitely not Kosher...
This is my dog standing guard over the bacon turkey while it cooked...

Poor thing didn't even get a bite...
Finished turkey, half of it already sliced & served...

It seemed to be a hit...
Christmas came to our household. Per tradition, we dressed our dogs up in silly outfits. Here they are by one of our trees...

Look at their cute little butts!
My husband got an AirSwimmer shark for Christmas. Here it is circling over Bethlehem like the Goodyear Blimp (ignore the messy couch pillows)


That about catches us up :-). I will have a new recipe up soon!