Thursday, June 16, 2011

No-Knead Bread-- Rustic, Easy, Cheap and Delicious

I have a goal to start making most of our own baked products for two reasons: (1) I will know what is in them that way  (2) When you look at the cost of necessary ingredients versus the cost bread is sold for...it's a huge markup.

Because of this, I have started browsing a lot of bread recipes.  A lot of them require a lot of different mixing,kneading & rising steps until you get to the baking stages.  That's fine...if it's a weekend & I have a lot of time to do this.  But what about on weekdays?

I think I have found a good solution.  This bread is Super Easy, Super Cheap, Vegan/Vegetarian, and it is DELICIOUS.  The end product is a rustic looking loaf that has a crust that is both crispy & chewy, and the inside is incredibly light & airy. Granted, this dough has to hang out on your counter for a long time...but you don't have to do anything with it. No complex kneading. No tired arms from kneading for 30 minutes, etc.  I highly recommend this recipe, and I will be making this again in the very near future. I'm really excited to try out French Toast with this bread later this week.

Fresh baked bread that is near-zero on the effort scale? Yes please.


This recipe is modified from a recipe by Jim Lahey as featured on the New York Times on 11/8/2006.


No-Knead Bread
Working time: 8 minutes. Rising time: 10 hours to 24 hours. Baking time: 45-60min. Makes 1 Loaf


Ingredients
Ingredient Lineup: Water, Salt, Flour, Yeast & a tad bit of sugar....
that's it.

  • 3 cups all purpose flour or bread flour, plus additional for dusting & surface prep
  • 1/4 t. instant yeast
  • 1 1/4 t. salt
  • 1 t. raw sugar or granular sugar (optional)
  • 1 5/8 cups of warm water
Directions
1.  Place flour in large bowl.  Mix in yeast, salt & sugar.  Gradually stir in warm water until dough is incorporated.  It will be a very wet, sticky dough.  Cover bowl tightly with plastic wrap & leave on the counter to rise for 10 hours to 24 hours.  I mixed this up at 10:00pm, & it went into the oven at 7:00pm the next day, total rising time was around 19 hours + an additional 2 hours for step 3.

Ingredients post mixing.

Dough in the morning after 10 hours of rising.
Dough after 19 hours

2.  Prepare your counter top or a large cutting board with a generous sprinkling of flour.  Move the dough from the bowl to the floured surface.  Sprinkle the top of the dough liberally with flour, and fold it over on itself twice.  Gently coat all sticky surfaces of the dough with a light dusting of flour.  Cover lightly with plastic wrap & let rest for 15 minutes.

3.  Place a kitchen towel (cotton, not terrycloth) in a large bowl.  Liberally flour the surface of the towel (this keeps it from sticking).  Place the dough on the towel & cover with a 2nd towel.  Let stand for 2 hours.

Use a lot of flour.  You don't want the dough to mate with
the towel. 

Put dough in floured towel.

Cover the dough. (Thanks to my cousin Michelle for the
uber-fun embroidered kitchen towels. :-) )

Dough after an additional 2 hours of rise time.

4.  Preheat your oven to 450 degrees.  While oven is heating, place a 5-6 quart lidded enameled dutch oven, cast iron pot, or large casserole dish in the oven.  You need this container to be as hot as the oven.  Place the dough in the bottom of the pot & cover.  Bake covered for 30 minutes.  Uncover & bake an additional 15-30 minutes until the crust is golden brown.

Preheat your pot! Without using oil or anything, the dough will
fuse to a cold pot.

Raw dough, ready to get toasty.

After first 30 minutes of baking.  It looks delicious already.

After an additional 15-30 minutes...it's done.
5. Carefully remove pot from oven & remove loaf from the pot.  Cool on a cooling rack.  Dust off excess flour, slice & serve.  

Let the loaf cool on a rack for awhile.  Make sure to dust off
excess flour.  

Slice.

& Serve. :-)  We had ours with lemon curd & homemade
blueberry preserves for dessert.  


Sunday, June 12, 2011

Lamb Burgers with Herb Yogurt Sauce

This was a quick, easy meal I made earlier this week with some ground lamb we had picked up on sale.  These burgers can be cooked on the grill, on a cast iron grill pan, or pan seared on the stove. The burger meat could also be formed into lamb meat balls with a little bit of cracker & egg binding. 

I made these burgers on toasted 100 calorie sandwich rounds, topped with steamed spinach & herb yogurt sauce (recipe below).The herb yogurt sauce is a perfect fat-free alternative to cheese, and it added a lot of flavor to the burgers.  It is also great as a dip for fresh veggies. For the spinach I used a box of frozen spinach, steamed it in the microwave & then pressed all of the excess water out of the spinach.  I served these with roasted red potatoes. The hubs requested that I make this meal again sometime soon...so I guess it was ok?


Not the best photo...but it was delicious.

Lamb Burgers
Prep time= 8 minutes.  Cook time= 15-20 minutes. Serves 4.

Ingredients

Ingredient Lineup
  • 1 pound lean ground lamb
  • 1 t. ground rosemary (needles will work, but crush or grind them first)
  • 1/2 t. dried oregano
  • 1/4 t. ground white pepper
  • 1/4 t. ground black pepper
  • 1/4 t. dried basil
  • 1/4 t. dried thyme
  • 1/4 t. salt (optional)
  • 1/2 t. garlic powder
  • 1 T. olive oil
Directions

1.  Mix all ingredients together.  Form into patties. Grill over Medium to Medium High heat to desired doneness.  While burgers are cooking, prepare the yogurt sauce & spinach. 

Spices mixed up & ready to be added to the meat.

Patties ready to be grilled...

Patties on the grill...yum.

Herb Yogurt Sauce
Prep time 5 minutes. Serves 2-3

Ingredients

Ingredient Lineup
  • 1/2 cup fat free greek style yogurt (I love Fage 0% Greek Yogurt)
  • 1 clove garlic, finely minced
  • 2-3 leaves fresh basil, chiffonade
  • 1/4 t. dried oregano
  • dash freshly ground pepper
Directions

1.  Gently fold all ingredients together.  Do not stir too vigorously or it will break the texture of the yogurt.  

Yogurt Sauce


Talbot Street Art Fair Finds

For the past few years, I have wanted to go to the Talbot Street Art Fair.  It's a free art fair downtown Indianapolis that takes up 4-5 blocks & the surrounding area.  It seems like we normally have something else going on & we don't get to go.  This year it worked out for us to go to BOTH days of the art fair.  We had GORGEOUS weather this weekend.  It was perfect for browsing around outside.

I love art fairs.  I love looking at the results of someone else's creative processes.  There is normally a ton of stuff I'd love to have on my walls (almost always above my price range).  Typically there is also a lot of stuff that I find hideous, but I can still respect the time & effort that went into making the pieces.  These are the things we walked away with this weekend...

I have wanted an olive oil bottle for awhile.  I cook with olive oil almost everyday, so the bottle never seems to make it back in the cabinet after meal prep.  Since you aren't supposed to let olive oil be exposed to excess air & light, that's poses an additional problem on top of the eyesore labeled bottle sitting on my counter 24-7. I've looked for ceramic olive oil bottles before & just haven't found one that I like.  That problem was fixed this weekend...

The colors are a little more muted than
they appear in this photo...

I'd like to tell you who the potter was for it...but his flyer apparently didn't make it into the bag with the bottle.  I love this bottle.  The way it was squeezed before being fired causes it to fit perfectly in my hand, & also has a good amount of "grippiness" to it because of the dents.  The green color on top is a perfect muted shade of our accent green color from our kitchen, & the muted yellow/beige color on the bottom coordinates with our tiled backsplash.


There was also this great vendor called Of Nature at the art fair.  This guy takes natural elements like flowers, leaves, seed pods, etc. and copper plates them, & turns them into earrings, pendants, brooches, etc.  Perhaps it is my inner nature lover & biology nerd...but I thought these were incredibly fun.  I ended up getting two pendants.  I can't wait to get them mounted on cords & wear them.

My 2 pendants. A daisy & an orchid.  Perfectly preserved
in copper.
Our final purchase is what necessitated going back to Talbot St for the 2nd day of the art fair.  There was a vendor from Louisiana who takes weathered wood, makes fun planters, planting tables & other outdoor patio elements out of the wood, & then paints them in bright colors & adds distressing & patina elements to the paint. I'd tell you his name, but he didn't have it posted.  I fell in love with one of the bright green ladder planters.  I had been trying to think of a fun way to switch up how I am growing my herb garden, instead of the boring planters I've been using the past 4 years. We didn't end up getting it yesterday since we were rushing to get to dinner plans with my coworkers...but after discussing it last night, we thought it was worth the trip back downtown today to get the planter.  I would have loved one of the planting tables that matched...but that wouldn't have been practical (nor would it have fit in Jason's car :-P).

My fun new planter...with the boring white one
behind it.  I did re-purpose the white planter into
another basil planter.  You can never have
 too much basil... :-)
I found some bamboo fiber "plastic" planters at Menard's that fit perfectly.  The end result is slightly Mardi Gra'ish...but I love it.  It's a fun bright spot on our very brown patio.  I can't wait to see how it ages over time...

My new herb corner of the patio. I think it
turned out pretty cute...
Yay for art fairs!  Hopefully we will be able to get to a few more this summer & fall...including Penrod.  It NEVER works out for us to go.  It seems like we always have 9 million things going on that weekend in September each year.

Thursday, June 9, 2011

Ultimate Coffee Cake

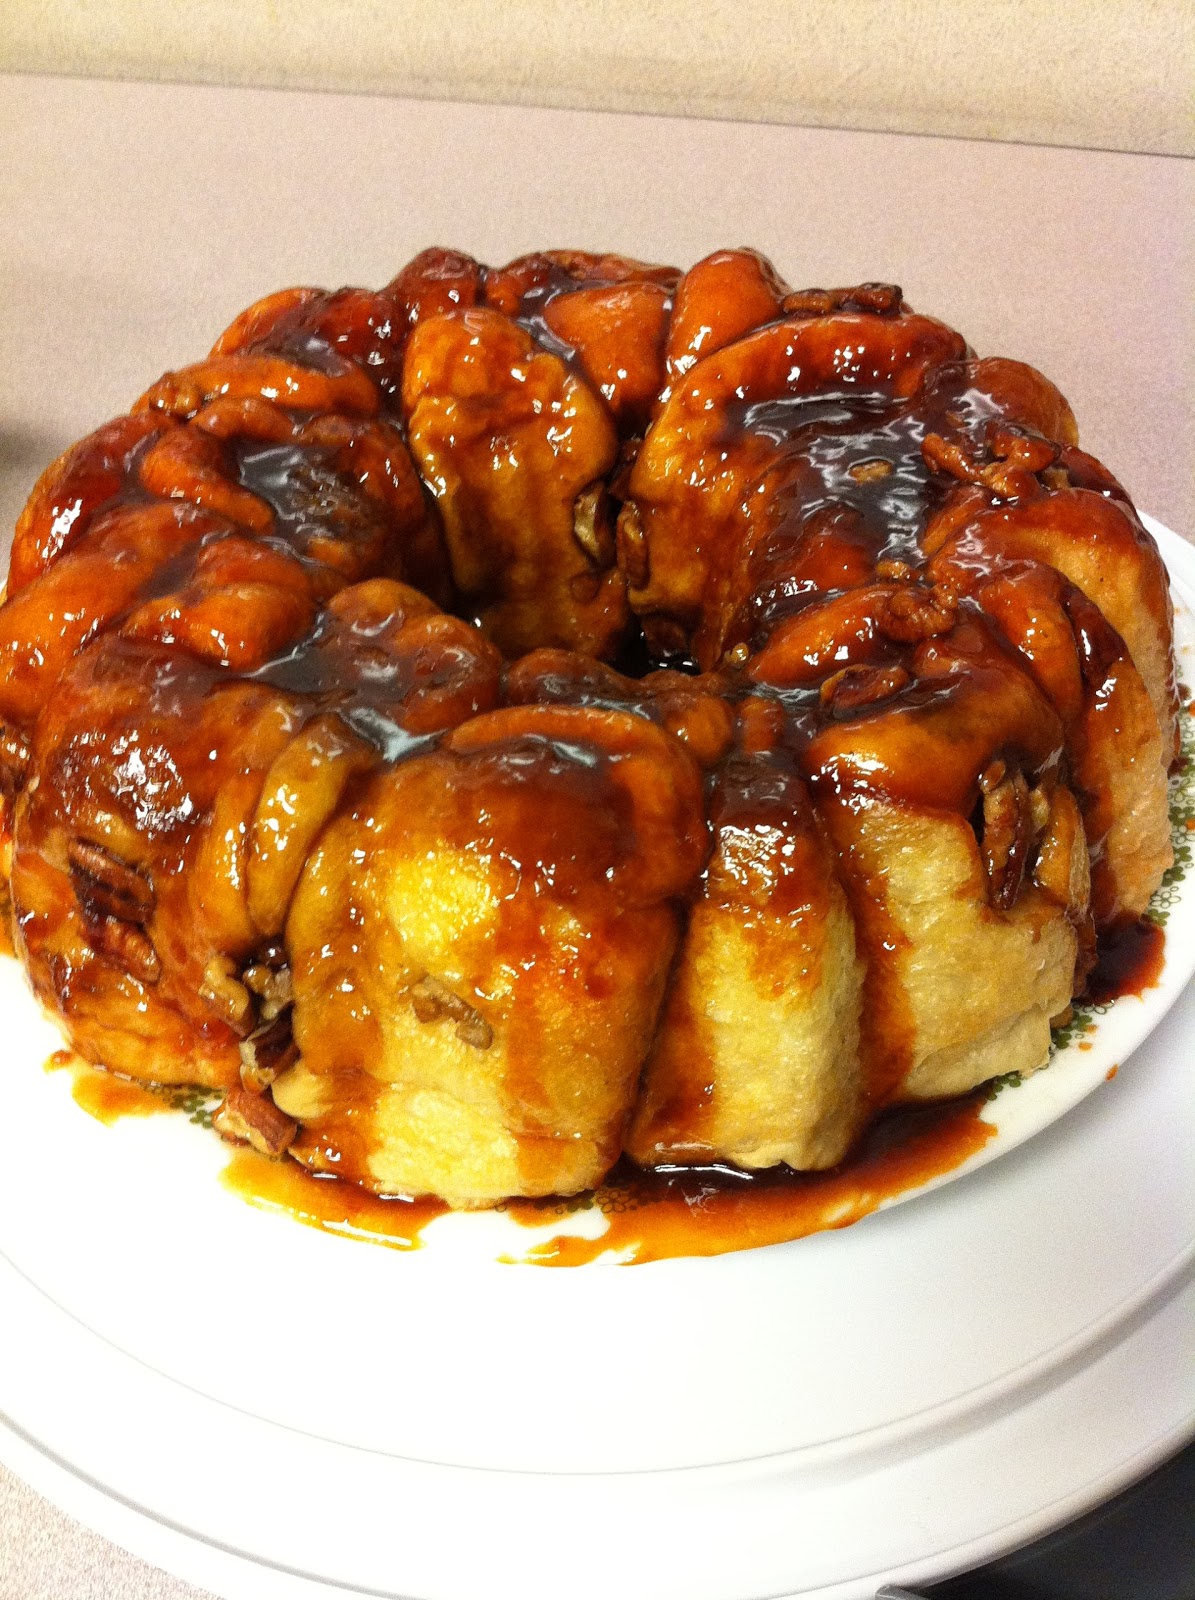
This coffee cake is delicious.  My mom introduced me to this recipe last year, and it's been a staple in my recipe box since.   This is the recipe for "Ultimate Coffee Cake" as presented on the Paula Deen show.  Per the comment sections on the recipe on foodnetwork.com, this is an old recipe from the Rhodes bread company.  No matter who came up with the original recipe...it is still wonderful, quick, easy & makes an impressive breakfast dish.

Gooey Awesomeness


I made this earlier this week for a work breakfast pitch-in.  It was still yummy as the day went on, even once the caramel sauce had cooled down (it stays gooey, it doesn't get chewy). I still want to experiment with this recipe to see what it tastes like when using different flavors of pudding, like vanilla. You want to be sure to use raw rolls (not the warm & serve frozen type) & cook and serve pudding (not instant). The bread will need to sit out 8-10 hours to rise prior to baking.  Therefore, you can make this recipe the night before, let it do it's thing on the kitchen counter overnight, and pop it in the oven before you get ready in the morning.  

Ultimate Coffee Cake
16-18 servings, Prep time= 5 min, Rest time= 8-10 hours, Cook time= 30 minutes

Ingredients
Ingredient Lineup

  • 16-18 unbaked/raw frozen yeast rolls (I used Rhodes traditional rolls.)
  • 1 package of Jello Cook & Serve Butterscotch pudding (3.5 oz)
  • 1/2 cup of brown sugar, packed
  • 1/2 cup of pecans, chopped
  • 1 stick of butter, melted
 Directions

1.  Grease a large bundt pan with butter or cooking spray.  Place the frozen rolls in the bottom of the pan.  (They will not take up much room--don't worry.  Do not put extra rolls in the pan, they will rise up & out of the pan.)

2.  Sprinkle the entire package of jello pudding over the top of the rolls.  Sprinkle the brown sugar over the top of the rolls.  Evenly distribute the chopped nuts over the top of the rolls.  Pour the melted butter all over the assembled ingredients in the pan.  (You do not need to stir the ingredients.  The "toppings" will fill in the crevices between the rolls as it cooks & when you plate the finished coffee cake.)

Ready to chill on the counter overnight & get puffy.

3.  Tightly cover the bundt pan with plastic wrap, this prevents the dough from forming a hard crust.  Let the dough rise overnight (8-10 hours).
4.  Preheat oven to 350 degrees. If the dough has grown taller than the pan, very gently "punch" the dough back down into the pan 1-2 inches. Bake cake for 25-30 minutes.
The dough after its morning punching

5.  Remove cake from oven & let cool 5 minutes.  Turn pan over onto a large plate or platter.  Gently scrape out any extra caramel & nuts out of the bundt pan.  (If you are using a "new to you" bundt pan, verify in advance that it will fit on the plate you are planning on using.  I learned the hard way that my new bundt pan is bigger than my old one...and I caramelized my counter & stove this time around)

Finished product on the pitch-in counter
I'd say it was a success...because this was all
that was left.


Friday, June 3, 2011

Easy Dessert- Raspberry Pound Cake Stack

This week beautiful raspberries were on sale for $1 a container at Kroger. I grabbed a pack on my walk through the grocery store, & tried to figure out something easy to do with them for dessert.  This is what I came up with. It's not overly inventive or fun...but the results were pretty tasty.

Delicious & Easy

Raspberry Pound Cake Stack
Serves 2, Prep time= 5 minutes

Ingredients
Ingredient Lineup
Directions
  1. Rinse the raspberries & gently dry them.  
  2. Place the cream & the vanilla sugar in a small mixing bowl.  Whisk until cream sets & it forms soft peaks.
  3. Place 2 of the slices of pound cake side by side on a plate. Layer on 1/2 of the raspberries. Place a dollop of whipped cream on top of the raspberries.
  4. With a paring knife thinly shave or chop the dark chocolate (you can also use a cheese knife/slicer). Sprinkle this on top of the whipped cream.
  5. Repeat for the 2nd dessert & serve
Great end to a work week

Thursday, June 2, 2011

Baked Jerk Chicken

This is my spice blend for jerk flavored baked chicken.  Whether this is truly authentic "jerk seasoning" or not, I have no clue.  This is what I came up with after experimenting with several different recipes. You can either toss the chicken in the spice mixture right before cooking, or prepare it the night before & leave it sealed in a bag in the fridge overnight. To see my tips & pictures on baking chicken, see this post.  Tonight I served this with roasted red potatoes & steamed broccoli.

Baked Jerk Chicken, Roasted Red Potatoes,
& Steamed Broccoli

Baked Jerk Chicken
Serves 2-4, Prep time 10 minutes, Bake time 1 hour-1 hour 15 min


Ingredients


Ingredient Lineup

  • 4-8 chicken pieces (or 1 whole chicken cut into pieces)
  • Extra Virgin Olive Oil
  • 1 t. salt [optional]
  • 1 t. ground allspice
  • 1 t. brown sugar
  • 1 t. minced dehydrated onion
  • 1/2 t. ground nutmeg
  • 1/2 t. ground black pepper
  • 1/2 t. ground ginger
  • 1/4 t. garlic powder
  • 1/4 t. to 1/2 t. ground cayenne (depending on desired heat level)
  • 1/4 t. cinnamon
  • 1/4 t. dried thyme leaves

Directions

1.  Preheat oven to 350 degrees.  Lightly grease a 13x9" glass baking pan with olive oil.

2.  Blend all of the spices together in a small bowl.  Put the chicken into a large zip top bag.  Pour the spices over the chicken, seal the bag, & toss until the chicken is well coated.

Spice Palette 

Blended Spices

Spice-coated raw chicken...ready to chill in the fridge overnight
or go straight into the oven.

3.  Place the chicken skin side up in the baking dish.  Bake in the oven for 1 hour to 1 hour & 15 minutes until chicken is done.  For crispier skin, turn on the broiler for 2-5 minutes before removing chicken from the oven.

Raw chicken ready to bake...For a picture of finished product
see the top of the page. 
  

Spice Cabinet Roasted Red Potatoes

I love making roasted potatoes.  They are low-maintenance, cheap, & reheat well for leftovers.  I always chuckle when I see people buying the frozen roasted potatoes at the grocery store.  They are about 5-10x's the cost of what it is to make them from scratch, and tend to be loaded with TONS of extra salt/preservatives. This is a super easy & economical side dish, especially since gorgeous baby red potatoes were on sale for $0.88/pound this week.  Normally I like to use fresh garlic & herbs when I make roasted potatoes...but sometimes there's not time to do all of the mincing, or I don't want to pay the prices for herbs at the grocery.  This is my recipe "Spice Cabinet Roasted Red Potatoes." This recipe is flexible for the time/temperature it cooks at, so it cooks easily beside other dishes in the oven.  Tonight I cooked this next to baked jerk chicken.  I use a cast iron skillet for this recipe but you could also use a glass baking pan or casserole dish.

Spice Cabinet Roasted Red Potatoes


Spice Cabinet Roasted Red Potatoes
Serves 2-5, Prep time: 5 minutes, Cook time: 45-60 minutes


Ingredients
Ingredient Lineup


  • 1-2 pounds red potatoes
  • 1 pat of butter [optional]
  • 1/4 t. kosher salt [optional]
  • 1/2 t. ground rosemary (whole needles work too--but crush them)
  • 1/2 t. ground black pepper
  • 1/2 t. garlic powder
  • 1/4 t. onion powder
  • 1/4 t. thyme leaves
  • 2 T. Extra Virgin Olive Oil

Directions

1.  Heat oven to 350 (or use whatever oven temperature between 300-450 degrees that is convenient to whatever else you are cooking.) Put the cast iron skillet in the oven to heat up.  

2.  Assemble all of the spices into a small container.  Add the olive oil to the spices & stir.  Set aside. 

Spice Palette 

Blended spices

Spice & Olive Oil Mixture
3.  Wash & dry potatoes.  Cut into quarters (or eighths if you are using large potatoes)

4.  Carefully remove the skillet from the oven.  Add a small pat of butter to the pan & coat all surfaces of the skillet [optional].  Put the potatoes into the skillet.  Drizzle the olive oil/spice mixture over the potatoes.  Stirring until potatoes are well coated with the oil & spice mixture.  Discard any of the extra spice mixture.

Potatoes evenly coated in the oil-spice mixture

5. Put potatoes in the oven.  Cook for 45-60 minutes, stirring every 20 minutes until the potatoes are done & browned.  If you want crispier potatoes, broil the potatoes in the skillet for 5 minutes before serving.
Picture of the potatoes 30 minutes into roasting

Finished crispy, delicious potatoes

Spice Cabinet Roasted Red Potatoes,
Steamed Broccoli & Baked Jerk Chicken