Wednesday, September 14, 2011

Baking a Chicken…in a slow cooker (Lemony Greek Chicken in a Slow Cooker)

I’m still fairly new to crockpot cooking.  I bought my current crockpot on a clearance sale at Meijer 2 years ago for $7 and didn’t actually begin using it until a year ago (when our oven died & it was a couple days for the part to come in).  I still do not rely on it heavily for cooking, but I do enjoy using a slow cooker on nights when I know that I’m going to have limited prep time for dinner.

When I first bought my slow cooker, I was a little surprised when the instructions told me not to cook a whole chicken in it.  To me, that didn’t make sense.  I also saw other information online that suggested not to bake a whole chicken in a slow cooker.  Again…I couldn’t comprehend why.

So, one time when whole chickens were on a super price, I decided to experiment.  It was a success.
With cooking a whole chicken in the crockpot, you have to put aside the expectation that the chicken is going to stay whole.  The chicken will naturally split into pieces due to the softening of the cartilage that holds it together.  But you can lift the chicken out of the crockpot by pieces, line them up on a cookie sheet, throw them under the broiler for a bit…and you are left with super juicy, super tender, & crispy skinned chicken.  It will taste like slow-baked, rotisserie chicken…without the effort.

You are also left with richly flavored chicken broth, & great chicken pieces from along the back to recycle for other meals like chicken & dumplings. Just check the “scraps” in the slow cooker for bones.  I will be posting a recipe soon that uses the leftover broth & chicken from this meal. 

You might be asking—“Um, there is no liquid added in this recipe?”  No—I don’t add any liquid when I cook whole chickens in the crockpot.  Most chickens are injected with water/broth, and when you combine that with a skin layer on the bottom that begins rendering early…you end up with PLENTY of liquid in the crock pot. 

Ok…enough rambling.  Here’s a recipe for a Greek-inspired baked chicken that you can prep in the crockpot. You can use whatever seasoning for baked-type chicken that you want to use (feel free to check out my prior poultry listings for ideas).

Lemony Greek Chicken in a Slow Cooker
Prep time: 15 min. Cooktime: 6-9 hours. Servings: Vary

Ingredients
Ingredient Lineup
  • 1 whole roaster or fryer chicken
  • 2 t. dried thyme
  • 2 t. dried oregano
  • 2 t. garlic powder
  • 0.5 t. dried minced garlic (or fresh equivalent)
  • 2 T. lemon juice
  • 1 T. olive oil (+ extra for greasing slow cooker)
  • 0.5 t. salt
  • 0.5 t. ground pepper


Directions

1.  Add thyme, oregano, garlic, minced garlic, salt, & pepper to a small bowl.  Stir ingredients. Add the 1 T. of olive oil and 2 T. lemon juice. Stir until ingredients are paste-like & well mixed.  Set aside.

Spice Palette

Spice Paste--not pretty looking, but smells AMAZING

2.  Remove chicken from wrapper.  Remove neck, giblets, gravy packet, or any other goop that is in the cavity of the bird (NOTE—always do a cavity search on poultry—gross stuff hides in there…stuff that tastes especially gross if you cook it inside the bird…like plastic gravy packets.) Rinse bird under cool water, & pat dry with paper towels.  Prop up & let it drain for a bit.
Birdy draining on a plate, ready to catch a tan...this one had
leprosy or some other skin disorder on its breast...

3.  Cover the top of your bird with the seasoning paste.  Feel free to slip some of the herb paste under the skin so that it more intensely flavors the meat (especially if you are going to remove the skin prior to consuming).

Slipping seasonings under poultry skin = intense flavor

4.  Lightly grease the sides & bottom of a large slow cooker with olive oil.  Place your seasoned bird, breast side up into the slow cooker.  Cover & cook on low for 6-9 hours until tender & juices run clear.
What it looked like when I left for work...

What it looked like when I got home from work...

5. Using kitchen tongs gently remove the pieces of the bird & place skin-side-up on a large cookie sheet.  Place cookie sheet under a low broiler until skin crisps.  Serve & Enjoy!
Chicken pieces on the cookie sheet pre-crisping.  I should
have arranged these more artfully...it was a long day. :-P

Crispy, lemony, herby & delicious

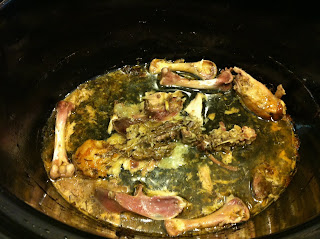
What is left in the crockpot.  Remove the bones. Save the meat.
Save the broth...

Strained broth.  Put a lid on it & put it in the fridge
overnight.  Skim the hardened fat off of the top &
use it as chicken broth in a recipe like chicken &
dumplings.  

Monday, August 29, 2011

Guinness Pot Roast


Confession—growing up I hated pot roast.  My mom makes EXCELLENT pot roast, so I know it was not her cooking.  I’ve just never been too keen on things all cooked in one container (still fighting issues with food touching…).  Over the past couple of years, I have begun to LOVE pot roast.  Occasionally, I begin craving pot roast.  I had such a craving this past week.

I like making pot roast in my crockpot.  It’s low-maintenance and the results are usually tender & delicious.  This is currently my favorite prep method.  I love the depth of flavor this recipe has. I experimented with this a lot before settling on the ingredient list/amounts.  When making pot roast in the slow cooker, I will slow cook the meat with a few of the vegetables all day.  When I get home from work, I blend or mash the vegetables that are in the crockpot (super mushy by that point) to get a good gravy base to develop.  I then add the vegetables I will be serving, so that they still have texture when it comes to dinner time. 

If anything is not clear in this recipe, please let me know.  It’s 11pm when I’m typing this…and there are bound to be “huh?” moments (like the double bullet points--no clue what's going on, I'll check out the HTML tomorrow)…Also, please forgive the lack of “finished product” photos. I actually made this for dinner when my mother-in-law was visiting last weekend, and I totally forgot to take a “it’s done” photo. 

Guinness Pot Roast
Prep time: 15 min. Cook time: 7-9 hours. Servings Vary

Ingredients
Ingredient Lineup.  Biggest Roast I've cooked...ever.
  • 1 beef roast (cut of choice, enough meat to serve the # of people)
  • ·         2-3 T. vegetable oil
  • ·         2-4 T. flour
  • ·         1 t. ground black pepper
  • ·         1 bottle of Guinness (resist urge to drink)
  • ·         1 package of Lipton Beefy Onion soup mix (or 2 cans of beef broth reduced in half by simmering on the stovetop)
  • ·         2 cups pearl onions or 2 medium, wedged onions (add an extra cup of onion if not using soup mix)
  • ·         2 stalks celery, coarsely chopped
  • ·         2 bay leaves
  • ·         2-3 cloves minced fresh garlic (or dried equivalent)
  • ·         Potatoes (based on # of people serving)
  • ·         Baby Carrots (based on # of people serving)
  • ·         [optional] 0.5 t. dried thyme
  • ·         [optional] Salt, as needed
  • ·         [optional] Corn starch slurry or potato buds to thicken gravy

Directions
1.  Heat oil in a large skillet.  Coat roast in flour & black pepper. Brown roast on all sides in the oil.  Remove roast from pan & place in the bottom of a large slow cooker.  Surround the roast with some of the vegetables.  I typically peel & cut up 1 potato.  I then add a handful of baby carrots, 1-2 cups of pearl onions, the garlic & the celery.  Sprinkle the onion soup mix over the vegetables & roast.  Pour the Guinness over the contents in the pan.  Add the bay leaves & thyme.  Cover & refrigerate overnight, or immediately begin cooking the roast.
Brown roast in pan

Layer in some veg.

Add some more veg & the powdered soup mix.

Pour in beer, add herbs & prep for deliciousness

2.  Cook roast in the slow cooker on low for 5-7 hours.

3. [Optional] Remove roast & bay leaves from the broth.  Transfer the broth & vegetables to a blender, or using an immersion blender, blend the vegetables & broth until smooth.

Roast after 5 hours.

Using one of my favorite kitchen weapons...

Roast back in the broth, ready to get a heaping mound of onions,
potatoes & carrots added to it...and finished off for a delicious dinner.
Imagine that there are more photos... :-/  

4. Return roast to the broth & add remaining vegetables.  Cook on low for an additional 1-2 hours.

5.  Remove roast & vegetables from the slow cooker.  Serve gravy, or use a corn starch slurry or potato buds to thicken gravy to desired consistency.  

Back...For Real!

Ok--I'm back...for real.

I let the blog slip by without a post for this past month...but no worries, I have a HUGE backlog of recipes & photos to post over the next couple of weeks.

Brief explanation of a few things that have been going on this month (there's more, these are just the major points):


1.  We had our first garage sale.  My mom joined us for the adventure.  It was 3 fun-filled days of sitting in our garage on lawn chairs, eating takeout & people-watching while people rummaged through our old treasures.  Overall we made pretty decent money, although we still have a few large items we need to Craigslist so we can make room to actually park cars in our garage this winter.  I did think it was highly comical the number of people who were shopping through garage sales simply looking for gold & silver.  My favorite is how sneaky they were trying to be.  But when you break out a magnifying glass…not so sneaky.

My favorite part of the garage sale was our squirrel shopper.  We have a TON of squirrels around our house.  In the late morning, while the garage sale was quiet & patron-free, a skinny little squirrel came to browse.  I have a sneaking suspicion that he plays on our driveway during the day while we are at work.  He casually walked around our driveway, looked over at us sitting in our lawn chairs, and then went back to his browsing. He then saw his reflection in the glass of an entertainment center & his tail puffed up.  After a few seconds of challenging himself in the glass, he walked behind the entertainment center to look for the other squirrel, and then ran off on his merry way.  I’m still disappointed that he didn’t buy anything…

Little Squirrel--Big Tail


2.  I bought a new car!  I have investigated different cars for the past 5 years.  I knew I wanted something new/newer, but I just couldn’t find a vehicle that I was willing to commit to the car payments.  I knew I wanted something in the small SUV/crossover class of vehicles, because it was similar to what I was used to driving.  I thought I had investigated about everything in that class, but when I was in Florida, I saw a commercial for the Mazda CX-7.  I thought, “That’s Cute,” and I liked the financing offers that they were advertising. When we were driving back from Florida, I was passed by a Mazda CX-7 on the interstate, and I thought “Wow, That’s Really Cute and Fast!”  When I got back from Florida, I started investigating the CX-7.  I liked the features & options…and absolutely loved the styling of the vehicle.  July turned to August, and the revised financing deal on the CX-7 became even more enticing.  One test drive and I was sold.  I LOVE my new car.  The funny thing is that until a month ago I had never considered getting a Mazda.  For some reason I thought they only made sporty small cars, sedans, & a minivan…  Apparently I was wrong.

 I still have to name my car though…any suggestions?

My new baby.  I love her.

3.  I sold my old car…  It’s bittersweet.  I got my Jeep Cherokee as a graduation gift from my parents my senior year of high school.  I had a lot of fun in that car.  It carried my piles of stuff to and from college each year.  It carried me on adventures with my friends, like spring breaks, college road trips, and midnight shopping trips.  It was around for my first dates, first loves & first heartbreaks.  It was an excellent vehicle.  However, I had grown to loathe the poor gas mileage & other inconveniences…which was becoming more loathsome with each 30-minute-each-way daily commute.  So after getting my new vehicle, we cleaned up my car & posted it on Craigslist.  Within 7 hours, we had over 28 emails/phonecalls about the Jeep.  We actually ended up selling it that night to the first person who looked at it, and I sold it for only $200 less than my asking price, which was more than the Kelly Blue Book Value for the car.  Not too Shabby…although selling a vehicle on Craigslist is an interesting experience.  We had some “interesting” phone calls & voicemails about the vehicle…my favorite was the male chauvinistic jerk who asked me “Don’t you have a husband I can talk to…”  Fun times, in retrospect, I really should have given that guy a verbal lesson about the year 2011…


I'll miss you my friend...thanks for the memories.

It was sad scraping my sorority sticker & college parking permits off of the windows though.  It was like ripping off the final Band-Aid of my youth.  

My ChiO sticker had seen better days...oh, the symbolism.

I’m now officially an adult.

To help me feel a little younger...
We went to a private party at the zoo...it was a blast.

I dressed my mini schnauzer up like Elliot from ET. Schnauzer Pride = Wounded

Sunday, July 31, 2011

Sorry for the Hiatus...I ran away again

I just got back from a great road trip with my mom to Florida.  When I was in college we used to drive to Florida every year for a Mother-Daughter week, but we haven't been able to make a trip in recent years. We had a great week, I got a bit of a tan on my pale self, & we had a blast.  I'm excited to be back at home with my Hubs & our dogs.

I didn't have a steady internet connection on vacation, so I fell behind on blogging.  I have several posts in mind that should go up later this week.

I'll finish this super-short post with a picture of a gorgeous Florida sunset...

Tuesday, July 19, 2011

Our New Island Oasis

When we bought our house a little over a year ago, I fell in love with the tri-level floor plan.  I also fell in love with the amount of space the kitchen had, considering the house was built in 1979.  It also has a good amount of counter space--but not that much of the counter space is located by the stove.  The prior owners had a pub height table in the middle of the kitchen, so I knew that there would be room enough for a small island to go in that spot one day.

The day we moved into our house, my mom went out to the store and bought us a card table & folding chairs to put in the kitchen as a space holder.  The main reason for this was that there are lights at the PERFECT height for my forehead in the middle of the area--meaning I had already slammed my forehead into the glass lights 3-4 times within the first 2 hours of owning the house. Ouch.

That card table has been the platform to serve several holiday meals (i.e. Mother's Day & Thanksgiving) & to hold the food for our parties and gatherings.  But due to the short height & the flimsy structure, it was difficult to do much food prep on.

We lived with the card table for over a year while we were researching various options for the island (prefab, build with recycled cabinets, have it built, etc).  A few months ago my parents offered a very generous gift--to let us design & build a custom island for our kitchen for our first anniversary. While we felt guilty accepting such a huge gift, we were really excited.

What we were doing before...


To help us mock out the footprint of our island, my dad gave us a TV box to put on top of the table that was roughly the size of the surface of the island we were thinking would work well in the space, along with being the similar combined height of a counter.  The TV box stayed on the card table in our kitchen for 1-2 months...it was always fun to explain to people why we had a cardboard box in our kitchen.

"Is that a..?" "Why Yes...it is a cardboard
box in our kitchen."

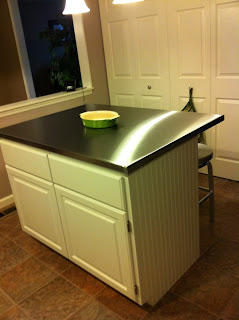
The design process was really fun.  We ended up going with one large cabinet section with a shelf on the bottom & 2 huge drawers on top that have "soft close" mechanisms on them (impossible to slam them shut, they close slowly).  The cabinet is painted the same shade of white that the rest of our cabinets are painted, and it is trimmed with the same style of bead board that is used in our family room & guest bathroom. We had it topped with restaurant grade stainless steel.  We bought these stools from Crate & Barrel to finish off the look.

We. Love. Our. Island.  We had the option of about any type of counter top material we wanted...but I wanted to go with stainless.  A) Heat Resistant  B) Stain Resistant  C) Break Resistant  D) Super Sanitary.  It is also a great work surface to do things like candy/chocolate making or bread kneading.  The only con is that it scratches easily...but once it gets a little more wear on it, that won't be noticeable at all.

I am so grateful for this wonderful gift...and the years of enjoyment we are going to get out of the island.  Thank you Mom & Dad!!

New Island: View 1

New Island: View 2

New Island: View 3

Bottom Cabinet--Yay for pot & pan storage close to the stove!!

Closeup of the pan side of the cabinet.
As a side note, the pan stacker/organizer
from Rubbermaid (bottom left) is awesome,
and I highly suggest you get one.

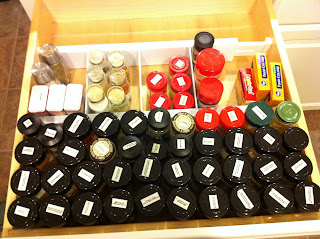
Drawer 1: Yay for my spices being away from the heat of
the stove!  I can't wait to finish organizing this drawer.
Eventually all of the spices will be in the same type of bottles,
and in alphabetical order.


Drawer #2...organization still a work in progress.

Demonstration of the "soft close" drawers

Monday, July 18, 2011

Sugar Cookies that Keep their Shape--and are fun to decorate!

Sometimes it is incredibly fun to kick back on a Friday night & do the things you liked to do as a kid...like decorate cookies.


We've been running the family reunion gauntlet these past couple weeks.  For our dessert contribution both weeks, we have taken sugar cookies that we decorated, giving us the excuse to decorate cookies two weeks in a row. Fun times!


A couple weeks ago at Ikea we picked up a fun set of cookie cutters that I couldn't wait to use.  It's not everyday that you come across hedgehog, squirrel & snail cookie cutters


For making the cookies I could have taken the easy way out & bought a roll of Pillsbury pre-made dough...but in my experience, that dough spreads WAY too much when baking the the cookies lose their fun shapes.  So I did a little Google searching and came across this cookie recipe from KittenCal.  I combined these cookies with a standard royal icing recipe...and overall I think we were pretty successful in our cookie making skills.


These cookies were a hit with children & adult alike at both family reunions.  More pictures are at the end of this post.


The verdict--This is a pretty good sugar cookie recipe and the cookies mostly retain their shape while baking.  I anticipate playing with the flavoring & sugar ratios in the future, and can't wait to make a batch that has small-flake unsweetened coconut added to the cookie dough.  Yum.


Additional Suggested Tools:  plastic bags, food dyes, icing tips [optional], synthetic bristle paintbrushes [optional], toothpicks [optional]

Buttery Cutout Sugar Cookies by KittenCal
Recipe source: food.com, Prep time: 8 min, refrigeration: 1-2 hours, Cook time: 4-6 min/batch

Ingredients
Ingredient Lineup

  • 1 cup butter, softened (2 sticks, no substitutions)
  • 1 cup sugar
  • 2 eggs
  • 1/2 t. vanilla
  • 1/2 t. almond extract
  • 3 1/4 cups all-purpose flour
  • 1/2 t. baking soda
  • 1/2 t. baking powder
  • 1/2 t. salt

Directions

1.  In a medium bowl, stir together flour, baking soda, baking powder & salt.  Set aside.

2.  In a large mixing bowl, combine the butter, sugar, eggs, vanilla and almond extract.  Mix with electric mixer on medium speed until light & fluffy.
Dry ingredients on the left, butter/egg ingredients on the right.

Fluffy butter/egg/sugar mixture post mixing.

3.  Using a rubber spatula, fold the flour mixture into the butter mixture in small increments, until all ingredients are combined.  Press the dough down into the bowl & cover with plastic wrap.  Refrigerate for 1-2 hours to let the dough cool back down & set. 
Assembled dough.  Cover it up & pop it in the fridge to cool
back down & let the butter fat re-solidify
4.  Preheat oven to 400 degrees.

5.  Line cookie sheets with parchment paper.  

6.  Lightly flour your work surface & rub a rolling pin with flour.  Move the cookie dough to your work surface & roll out until approximately 1/4 inch thick.  Cut cookies with cookie cutters.  Place cookies approximately 1-2 inches apart on the cookie sheets. 


Roll it out  Don't forget to put flour on your rolling pin.

Stamp out the cookies.
7.  Bake 4-6 minutes until done & edges get slightly golden brown.  Remove cookies from oven & move to cooling racks.  When cool, ice cookies with the frosting of your choice.


Tanning cookies
Cooked cookies...Move to a rack & let them cool.

Royal Icing
Prep time: 3 min

Ingredients

  • 3 T. meringue powder or powdered egg whites*
  • 4 cups confectioners' sugar
  • 6 T. water
  • Lemon juice

Directions


1.  In a large mixing bowl, mix the egg whites, sugar & water on medium speed until icing gets thick and glossy (approximately 3-5 minutes).  Add lemon juice until icing reaches desired consistency (I add lemon juice until the icing is still thick, but has a little bit of fluid movement to it).


Powdered sugar, powdered egg whites & water

Glossy royal icing (with half of it already moved to bags
before I thought of taking a picture)
 2.  Using a large rubber spatula, move spoonfuls of icing to individual plastic bags (with or without icing tips). Color with food dye and ice cookies.  Be very careful to not expose the icing to too much air, as it dries very quickly.  Ice & set cookies aside to dry.  When dry, cookies can be stacked on a platter.  Keep covered with plastic wrap. (*You can use the equivalent of fresh egg whites, however powdered egg whites have been pasteurized so you are not running a salmonella/e.coli risk.)
Add an icing tip to a plastic zip top bag, or cut the corner off
of the bag.  It works both ways (I personally prefer the ease of
control with icing tips)
Spoon 1-2 spoonfuls of icing into each bag
Add food dye & squeeze to mix

Our icing lineup
Blue bear (Hubs creation)
Hipster waffle-shell snail (my creation)
Harry Potter Snail (Hubs Creation)
Roadkill Fox (Hubs Creation-- this guy got smushed while cooking)
Tie-dye Hedgehog (Hubs creation)

Happy Snail
Polar bear cookie & a hedgehog with sunglasses
Hipster hedgehog
Tripped out snail
Toothpicks and paintbrushes help a lot
Moose in leg casts (Hubs creation--the poor creature's legs broke off)

Lippy Snail (Hubs creation)

Purple Squirrel (Hubs creation)
Happy Hedgehog