Monday, January 23, 2012

Snicker-doodle-do!

[Please forgive the formatting issues on this post] My favorite cookie will eternally be the soft, semi-baked blissfulness of a chocolate chip cookie straight from the oven.  That cookie’s too soft to remove from the cookie sheet, you say?  That’s ok, I’ll stand here in my kitchen & eat one with a spoon straight off of the cookie sheet until they set up a bit [true story].

However, the cookie that ties for #2 in my heart is a perfectly made snickerdoodle.* I think my affinity for the snickerdoodle comes from the fact that I rarely had it as a kid, mainly as a result of my love of chocolate-chippers per previously discussed. Snickerdoodles were something I only had at school, since you didn’t get a choice of cookie flavor, or on the rare lunch outing at Shapiro’s where my parents would let me pick out a cookie from the bakery after our meal.

But in my previous attempts at baking snickerdoodles, I have been unhappy with the results. They were too crunchy, too blah, or just didn’t live up to my standards of snickerdoodle’dom.  Last week in a recipe e-newsletter that I receive, it listed a user-submitted recipe for “Soft Snickerdoodles.”  I was intrigued. Maybe it was for my craving for sugar at that time, or maybe it was the back of my brain still feeling dejected from my prior snickerdoodle failures…but I pinned the recipe in my “recipes to try” board & sat on it for a few days.**

Enter the weekend—I had some time to kill while a batch of bourbon ice cream I was making for my husband was spinning…so I randomly decided that warm snickerdoodles could be a good dipping vessel for bourbon ice cream. Plus, I had all of the ingredients.

I made the recipe per instructed, minus the step about chilling the cookie sheet.  I didn’t do that step for a couple of reasons 1) I don’t have room in my fridge to randomly set a cookie sheet in it. I cook—I have ingredients & leftovers, it’s full.  2) It’s January & my kitchen island is made of stainless steel.  I could store meat on that thing & it would stay at a safe temperature.   The other small variation I had is that my cooking time ended up being about 2-3 minutes longer than the recipe instructs. My first attempt to “immediately remove from the baking sheet” per the instructions, resulted in a cookie falling straight through the cooling rack with a loud ‘plop.’*** But that could also be due to our cruddy, uneven heating oven.  If you were using a convection oven, or one that could consistently maintain a temperature, this might be a non-issue for you. 

Overall, I was pretty happy with the recipe. A few suggestions:
  • Next time, I would make a half batch.  This recipe says it only makes 24 cookies, but my total estimated number would have been closer to 3-4 dozen w/ 1 inch balls of dough (had I made them all…I ended up reserving part of the dough to cook later, & then forgot to cook it the next day :-/).
  •  I would also vary the spice level a bit. I used my “sweeter” cinnamon, instead of my “hotter” cinnamon, and I think in future attempts I would either use a combination of the two or solely the “hotter” cinnamon. I am also tempted to toss in a little dash of ground ginger & allspice in the next attempt.
  • Next time I would use my stand mixer to make this dough. My stand mixer was occupied with spinning down the ice cream, so I attempted to mix with a spoonula. The dough is pretty stiff, & I finally had to use my hands to incorporate it all.  I don’t like getting my hands messy if I can help it…


Soft Snickerdoodles (submitted by Food.com user JuJu Bee)

Servings: “24” [see note above]
Prep time: 10 min. Wait time: 10 min. Cook time: 10-14 min [see note above]

Ingredients
  • 1 cup butter, softened (2 sticks)
  • 2 eggs
  • 1 ½  cups sugar
  • 2 ¾ cups flour
  • 2 t. cream of tartar
  • 1 t. baking soda
  • ¼ t. salt
  • 3 T sugar
  • 3 t. cinnamon

Ingredient Lineup

Directions
1. Preheat oven to 350

2. In a large bowl mix the butter, eggs & sugar together. In a medium bowl, mix the flour, cream of tartar, baking soda & salt together. 

Flour mix on the left, butter mix on the right.

3. Gradually mix the flour mixture into the butter mixture (I do it in thirds)

I had to get my hands dirty :-/...next time I'm using the stand mixer
4. Chill dough & chill an ungreased cookie sheet in the fridge for 10-15 minutes.

5. In a small bowl, mix 3 T of sugar & cinnamon.

6. Scoop small balls of dough & roll them in the cinnamon mixture to evenly coat the whole ball (I use a melon-ball scoop for uniformity).

A melon ball scoop = uniform cookies
Next time, I'm making a half batch. Too much dough!
7. Place on chilled baking sheet & cook for 10 minutes (10-14 minutes)

8. Move from pan to cooling rack immediately.

Soft & Delicious
We had them with some half-set Bourbon Ice Cream

*My other tie for #2 favorite cookie will be made & discussed for a future blog entry…2 batches of cookies at 1 time in our house = bad idea.

**Hello Pinterest. I now understand why the logical, responsible side of my brain resisted you for so long. You are ‘e-crack’ of an extreme magnitude…and I love you & don’t know how I lived without you for so long.

***Dear Santa & Birthday Elves—I need these cooling racks for my birthday next year. Our wide-wire ones don’t cut it. You can check out my “kitchen stuff I want board”* for additional ideas.

Monday, January 16, 2012

When you're "old"- you spend weekends doing this...

When you're "old & married," you find yourself doing fun things on the weekend like wandering around home improvement stores for 2 hours, discussing & dreaming of future home improvement projects. Such an exciting life... :-)

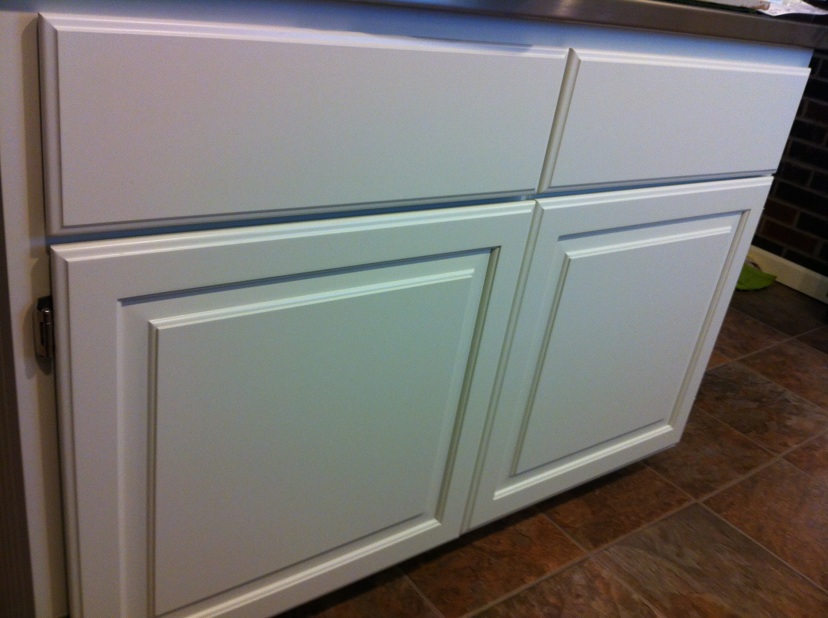
One home improvement project we have been debating since we moved into the house nearly 2 years ago is the subject of "kitchen cabinet hardware." The prior homeowners had updated the cabinets in the kitchen with new painted wood doors & drawer fronts.  They look nice, however there weren't any handles or knobs on them, which is really frustrating when your fingers are grubby from cooking & you need something out of the cabinet.  We initially delayed purchasing & installing hardware because the status of a kitchen island was still in limbo. I didn't want to get hardware for the cabinets, not knowing if we would be buying a prefab island with hardware that would be hard to match.

When my parents bought us an amazing custom island last summer we could have installed hardware on all of our cabinets, but then it became an issue of finding hardware we liked.

When we were at IKEA in December, we finally settled on the hardware.  It's similar to a style we liked in a hardware store, except the hardware was half the price per piece at IKEA. The hilarious thing is that we had forgotten the tally of how many knobs & pulls we needed at home...so we spent a good 20 minutes in IKEA diagramming our kitchen, referencing photos on our phones, etc to verify our count. Fun times.

We purchased the hardware in early December and then it sat in the bag until this past weekend.  It wasn't that we didn't have time to install it before now, it's because with any project like this, I have to sit on it for several weeks before I commit to having holes drilled in our possessions. Sometimes I have a fear of change...

Luckily I have a husband who is very detail oriented when it comes to projects like this. Because of his awesome "measure 3 times, drill once" skills, we now have a more user-friendly & polished looking kitchen.

Now for some pictures & tips...
Overhead Cabinet Example- Before
Overhead Cabinet Example- After
Base Cabinet Example- Before

Base Cabinet Example- After (I'm still not 100% sold on this
style of pull on our funky little drawers [which shouldn't have the
decorative trim]...but whatever, the holes are now there :-) )
Island- Before

Island- After
My rock star hubster
Masking tape on the cabinet doors gives an easy place to
mark where to drill & helps contain the sawdust & helps
keep the wood from splintering.
Buy a cabinet template to help you make sure all of your
knobs & pulls are mounted in the same place.

Since we had to pull everything out of the island drawers,
I took that opportunity to alphabetically organize my spice
drawer.  OCD Love. 

Sunday, January 8, 2012

Household Hint- improve your duvet cover

To me there is nothing better than sleeping under a cozy down comforter during cold winter nights. But it is also frustrating to reach for your comforter in the middle of the night & find out that your comforter is all bunched down in the bottom of the duvet cover. This easy solution also makes it easier to put your cover on your comforter. Also, this is a perfect way to modify an old printed comforter/bedspread to use it in a duvet cover for giving a bedroom a cheap redesign or upgrade.

 All you need is a spool of thread, two or four 6" pieces of ribbon, and a needle.

I used white because our new duvet cover is white. But if
you have a darker cover, the color of the supplies doesn't matter.

First step, turn your duvet cover wrong-side-out & spread it out flat on your bed (or a table) Fold 1 piece of the ribbon in half. Using the needle & thread, sew the folded ribbon into the bottom corner of the duvet. Be careful to only put stitches on the edge of the hem (you don't want the stitches to show when the cover is right-side-out).

Easy as pie. Just make sure to stitch it along the hem.

Repeat the step above with the opposite corner. Then, if the comforter you are using doesn't already have loops or ties on the corners, repeat this step with the bottom corners on the comforter. Our down comforter already had loops. So next, spread the comforter flat on top of the duvet cover.

Then tie the ribbon to the loops on the comforter. Then, all you have to do to wrestle your comforter into the cover, is to reach inside of the cover, grab a corner & pull. Repeat for the other side & shake your comforter into place within the cover.

See the sewn-in loops on the comforter (left side)
Little bow & you are done.

This is so easy, that I can't comprehend why the manufacturers don't do this from the start? But 3 of the last 4 duvet covers I've owned have been missing this feature. The reason I love to make sure the comforter is secured with ties is because it is super easy to straighten the comforter within the cover, leading to a less lumpy bed covering :-). In other news, here are 2 bad photos of our new bedding. It brightened up the room room a lot from the dark brown duvet cover that we had & it also gives us more options for sheets when we can no longer find our color of green sheets (that happen to match the curtains & lampshades...)


Friday, January 6, 2012

Back! For real...my resolutions demand it.

Wow...was it really September the last time I blogged?!? One of my resolutions this year was to start back on blogging, and to average 1 post a week. Not many people read this thing, but I personally enjoyed writing the blogs & taking the photos. Life just started getting a little more chaotic towards the end of last year, and my blog was back-burner'ed (or fell behind the stove & started gathering dust bunnies & grime). I was also losing a technology war. I was taking most of the photos with my iPhone & would have to email them to myself, download them to my laptop, & then write the blogs in my free time. It was a recipe for a pile of photos to accumulate & numerous blogs to go unwritten. Now I have my photos backing up to iCloud (thanks iOS 5.0!), which makes them accessible on my laptop, & my brand new iPad. Throw in a blogging app...and maybe this will be the secret to more consistent blogging? We'll see... For now, here's a quick glimpse into the past 4 months... In October we saw the Grand Canyon...

It's amazing.  I couldn't grasp how HUGE it was until I saw it.

and we saw the fountains of the Bellagio in Vegas (in my next life I want to be a fountain programmer...)...

I wasn't prepared for how loud the water was.
In Vegas we enjoyed some amazingly delicious treats from Jean Philipe Patisserie...

Raspberry Rose Tort

November rolled by...I hosted Thanksgiving, and smothered our turkey in bacon...

Definitely not Kosher...
This is my dog standing guard over the bacon turkey while it cooked...

Poor thing didn't even get a bite...
Finished turkey, half of it already sliced & served...

It seemed to be a hit...
Christmas came to our household. Per tradition, we dressed our dogs up in silly outfits. Here they are by one of our trees...

Look at their cute little butts!
My husband got an AirSwimmer shark for Christmas. Here it is circling over Bethlehem like the Goodyear Blimp (ignore the messy couch pillows)


That about catches us up :-). I will have a new recipe up soon!

Wednesday, September 14, 2011

Baking a Chicken…in a slow cooker (Lemony Greek Chicken in a Slow Cooker)

I’m still fairly new to crockpot cooking.  I bought my current crockpot on a clearance sale at Meijer 2 years ago for $7 and didn’t actually begin using it until a year ago (when our oven died & it was a couple days for the part to come in).  I still do not rely on it heavily for cooking, but I do enjoy using a slow cooker on nights when I know that I’m going to have limited prep time for dinner.

When I first bought my slow cooker, I was a little surprised when the instructions told me not to cook a whole chicken in it.  To me, that didn’t make sense.  I also saw other information online that suggested not to bake a whole chicken in a slow cooker.  Again…I couldn’t comprehend why.

So, one time when whole chickens were on a super price, I decided to experiment.  It was a success.
With cooking a whole chicken in the crockpot, you have to put aside the expectation that the chicken is going to stay whole.  The chicken will naturally split into pieces due to the softening of the cartilage that holds it together.  But you can lift the chicken out of the crockpot by pieces, line them up on a cookie sheet, throw them under the broiler for a bit…and you are left with super juicy, super tender, & crispy skinned chicken.  It will taste like slow-baked, rotisserie chicken…without the effort.

You are also left with richly flavored chicken broth, & great chicken pieces from along the back to recycle for other meals like chicken & dumplings. Just check the “scraps” in the slow cooker for bones.  I will be posting a recipe soon that uses the leftover broth & chicken from this meal. 

You might be asking—“Um, there is no liquid added in this recipe?”  No—I don’t add any liquid when I cook whole chickens in the crockpot.  Most chickens are injected with water/broth, and when you combine that with a skin layer on the bottom that begins rendering early…you end up with PLENTY of liquid in the crock pot. 

Ok…enough rambling.  Here’s a recipe for a Greek-inspired baked chicken that you can prep in the crockpot. You can use whatever seasoning for baked-type chicken that you want to use (feel free to check out my prior poultry listings for ideas).

Lemony Greek Chicken in a Slow Cooker
Prep time: 15 min. Cooktime: 6-9 hours. Servings: Vary

Ingredients
Ingredient Lineup
  • 1 whole roaster or fryer chicken
  • 2 t. dried thyme
  • 2 t. dried oregano
  • 2 t. garlic powder
  • 0.5 t. dried minced garlic (or fresh equivalent)
  • 2 T. lemon juice
  • 1 T. olive oil (+ extra for greasing slow cooker)
  • 0.5 t. salt
  • 0.5 t. ground pepper


Directions

1.  Add thyme, oregano, garlic, minced garlic, salt, & pepper to a small bowl.  Stir ingredients. Add the 1 T. of olive oil and 2 T. lemon juice. Stir until ingredients are paste-like & well mixed.  Set aside.

Spice Palette

Spice Paste--not pretty looking, but smells AMAZING

2.  Remove chicken from wrapper.  Remove neck, giblets, gravy packet, or any other goop that is in the cavity of the bird (NOTE—always do a cavity search on poultry—gross stuff hides in there…stuff that tastes especially gross if you cook it inside the bird…like plastic gravy packets.) Rinse bird under cool water, & pat dry with paper towels.  Prop up & let it drain for a bit.
Birdy draining on a plate, ready to catch a tan...this one had
leprosy or some other skin disorder on its breast...

3.  Cover the top of your bird with the seasoning paste.  Feel free to slip some of the herb paste under the skin so that it more intensely flavors the meat (especially if you are going to remove the skin prior to consuming).

Slipping seasonings under poultry skin = intense flavor

4.  Lightly grease the sides & bottom of a large slow cooker with olive oil.  Place your seasoned bird, breast side up into the slow cooker.  Cover & cook on low for 6-9 hours until tender & juices run clear.
What it looked like when I left for work...

What it looked like when I got home from work...

5. Using kitchen tongs gently remove the pieces of the bird & place skin-side-up on a large cookie sheet.  Place cookie sheet under a low broiler until skin crisps.  Serve & Enjoy!
Chicken pieces on the cookie sheet pre-crisping.  I should
have arranged these more artfully...it was a long day. :-P

Crispy, lemony, herby & delicious

What is left in the crockpot.  Remove the bones. Save the meat.
Save the broth...

Strained broth.  Put a lid on it & put it in the fridge
overnight.  Skim the hardened fat off of the top &
use it as chicken broth in a recipe like chicken &
dumplings.  

Monday, August 29, 2011

Guinness Pot Roast


Confession—growing up I hated pot roast.  My mom makes EXCELLENT pot roast, so I know it was not her cooking.  I’ve just never been too keen on things all cooked in one container (still fighting issues with food touching…).  Over the past couple of years, I have begun to LOVE pot roast.  Occasionally, I begin craving pot roast.  I had such a craving this past week.

I like making pot roast in my crockpot.  It’s low-maintenance and the results are usually tender & delicious.  This is currently my favorite prep method.  I love the depth of flavor this recipe has. I experimented with this a lot before settling on the ingredient list/amounts.  When making pot roast in the slow cooker, I will slow cook the meat with a few of the vegetables all day.  When I get home from work, I blend or mash the vegetables that are in the crockpot (super mushy by that point) to get a good gravy base to develop.  I then add the vegetables I will be serving, so that they still have texture when it comes to dinner time. 

If anything is not clear in this recipe, please let me know.  It’s 11pm when I’m typing this…and there are bound to be “huh?” moments (like the double bullet points--no clue what's going on, I'll check out the HTML tomorrow)…Also, please forgive the lack of “finished product” photos. I actually made this for dinner when my mother-in-law was visiting last weekend, and I totally forgot to take a “it’s done” photo. 

Guinness Pot Roast
Prep time: 15 min. Cook time: 7-9 hours. Servings Vary

Ingredients
Ingredient Lineup.  Biggest Roast I've cooked...ever.
  • 1 beef roast (cut of choice, enough meat to serve the # of people)
  • ·         2-3 T. vegetable oil
  • ·         2-4 T. flour
  • ·         1 t. ground black pepper
  • ·         1 bottle of Guinness (resist urge to drink)
  • ·         1 package of Lipton Beefy Onion soup mix (or 2 cans of beef broth reduced in half by simmering on the stovetop)
  • ·         2 cups pearl onions or 2 medium, wedged onions (add an extra cup of onion if not using soup mix)
  • ·         2 stalks celery, coarsely chopped
  • ·         2 bay leaves
  • ·         2-3 cloves minced fresh garlic (or dried equivalent)
  • ·         Potatoes (based on # of people serving)
  • ·         Baby Carrots (based on # of people serving)
  • ·         [optional] 0.5 t. dried thyme
  • ·         [optional] Salt, as needed
  • ·         [optional] Corn starch slurry or potato buds to thicken gravy

Directions
1.  Heat oil in a large skillet.  Coat roast in flour & black pepper. Brown roast on all sides in the oil.  Remove roast from pan & place in the bottom of a large slow cooker.  Surround the roast with some of the vegetables.  I typically peel & cut up 1 potato.  I then add a handful of baby carrots, 1-2 cups of pearl onions, the garlic & the celery.  Sprinkle the onion soup mix over the vegetables & roast.  Pour the Guinness over the contents in the pan.  Add the bay leaves & thyme.  Cover & refrigerate overnight, or immediately begin cooking the roast.
Brown roast in pan

Layer in some veg.

Add some more veg & the powdered soup mix.

Pour in beer, add herbs & prep for deliciousness

2.  Cook roast in the slow cooker on low for 5-7 hours.

3. [Optional] Remove roast & bay leaves from the broth.  Transfer the broth & vegetables to a blender, or using an immersion blender, blend the vegetables & broth until smooth.

Roast after 5 hours.

Using one of my favorite kitchen weapons...

Roast back in the broth, ready to get a heaping mound of onions,
potatoes & carrots added to it...and finished off for a delicious dinner.
Imagine that there are more photos... :-/  

4. Return roast to the broth & add remaining vegetables.  Cook on low for an additional 1-2 hours.

5.  Remove roast & vegetables from the slow cooker.  Serve gravy, or use a corn starch slurry or potato buds to thicken gravy to desired consistency.  

Back...For Real!

Ok--I'm back...for real.

I let the blog slip by without a post for this past month...but no worries, I have a HUGE backlog of recipes & photos to post over the next couple of weeks.

Brief explanation of a few things that have been going on this month (there's more, these are just the major points):


1.  We had our first garage sale.  My mom joined us for the adventure.  It was 3 fun-filled days of sitting in our garage on lawn chairs, eating takeout & people-watching while people rummaged through our old treasures.  Overall we made pretty decent money, although we still have a few large items we need to Craigslist so we can make room to actually park cars in our garage this winter.  I did think it was highly comical the number of people who were shopping through garage sales simply looking for gold & silver.  My favorite is how sneaky they were trying to be.  But when you break out a magnifying glass…not so sneaky.

My favorite part of the garage sale was our squirrel shopper.  We have a TON of squirrels around our house.  In the late morning, while the garage sale was quiet & patron-free, a skinny little squirrel came to browse.  I have a sneaking suspicion that he plays on our driveway during the day while we are at work.  He casually walked around our driveway, looked over at us sitting in our lawn chairs, and then went back to his browsing. He then saw his reflection in the glass of an entertainment center & his tail puffed up.  After a few seconds of challenging himself in the glass, he walked behind the entertainment center to look for the other squirrel, and then ran off on his merry way.  I’m still disappointed that he didn’t buy anything…

Little Squirrel--Big Tail


2.  I bought a new car!  I have investigated different cars for the past 5 years.  I knew I wanted something new/newer, but I just couldn’t find a vehicle that I was willing to commit to the car payments.  I knew I wanted something in the small SUV/crossover class of vehicles, because it was similar to what I was used to driving.  I thought I had investigated about everything in that class, but when I was in Florida, I saw a commercial for the Mazda CX-7.  I thought, “That’s Cute,” and I liked the financing offers that they were advertising. When we were driving back from Florida, I was passed by a Mazda CX-7 on the interstate, and I thought “Wow, That’s Really Cute and Fast!”  When I got back from Florida, I started investigating the CX-7.  I liked the features & options…and absolutely loved the styling of the vehicle.  July turned to August, and the revised financing deal on the CX-7 became even more enticing.  One test drive and I was sold.  I LOVE my new car.  The funny thing is that until a month ago I had never considered getting a Mazda.  For some reason I thought they only made sporty small cars, sedans, & a minivan…  Apparently I was wrong.

 I still have to name my car though…any suggestions?

My new baby.  I love her.

3.  I sold my old car…  It’s bittersweet.  I got my Jeep Cherokee as a graduation gift from my parents my senior year of high school.  I had a lot of fun in that car.  It carried my piles of stuff to and from college each year.  It carried me on adventures with my friends, like spring breaks, college road trips, and midnight shopping trips.  It was around for my first dates, first loves & first heartbreaks.  It was an excellent vehicle.  However, I had grown to loathe the poor gas mileage & other inconveniences…which was becoming more loathsome with each 30-minute-each-way daily commute.  So after getting my new vehicle, we cleaned up my car & posted it on Craigslist.  Within 7 hours, we had over 28 emails/phonecalls about the Jeep.  We actually ended up selling it that night to the first person who looked at it, and I sold it for only $200 less than my asking price, which was more than the Kelly Blue Book Value for the car.  Not too Shabby…although selling a vehicle on Craigslist is an interesting experience.  We had some “interesting” phone calls & voicemails about the vehicle…my favorite was the male chauvinistic jerk who asked me “Don’t you have a husband I can talk to…”  Fun times, in retrospect, I really should have given that guy a verbal lesson about the year 2011…


I'll miss you my friend...thanks for the memories.

It was sad scraping my sorority sticker & college parking permits off of the windows though.  It was like ripping off the final Band-Aid of my youth.  

My ChiO sticker had seen better days...oh, the symbolism.

I’m now officially an adult.

To help me feel a little younger...
We went to a private party at the zoo...it was a blast.

I dressed my mini schnauzer up like Elliot from ET. Schnauzer Pride = Wounded